Testing Integration
📥 STEP: Creating stories as incidents in ServiceNow
After the integration is finished, for every chatbot story created, an incident will be created in ServiceNow. For example, the creation of the following story number 9 in Slack:
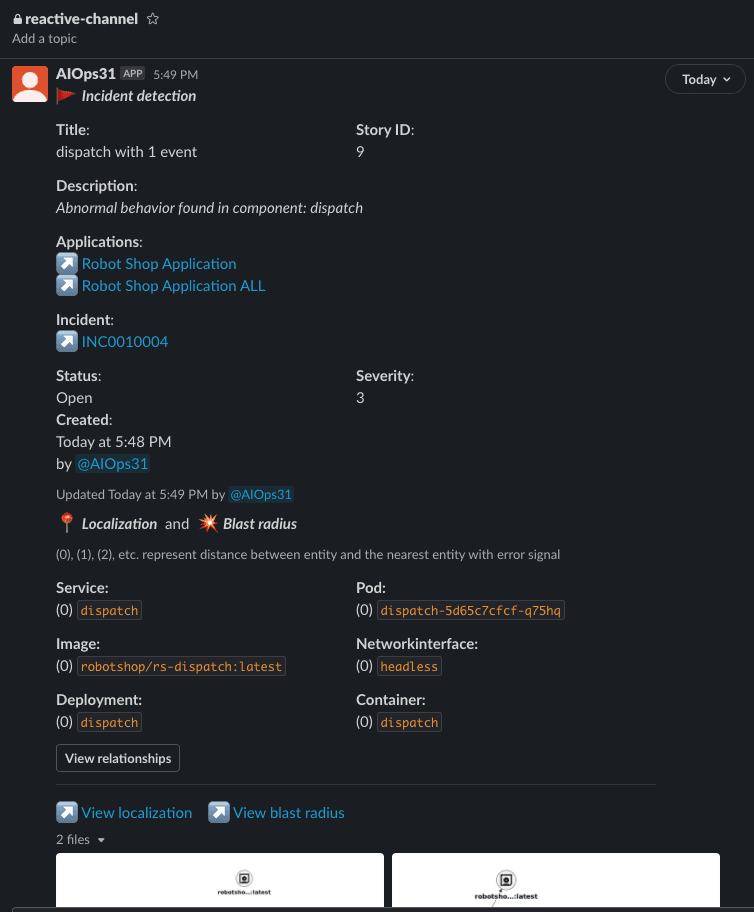
This story has a corresponding incident created in ServiceNow. To access these incidents, from the ServiceNow home page search for agent, and click on Agent Workspace Home, as shown below

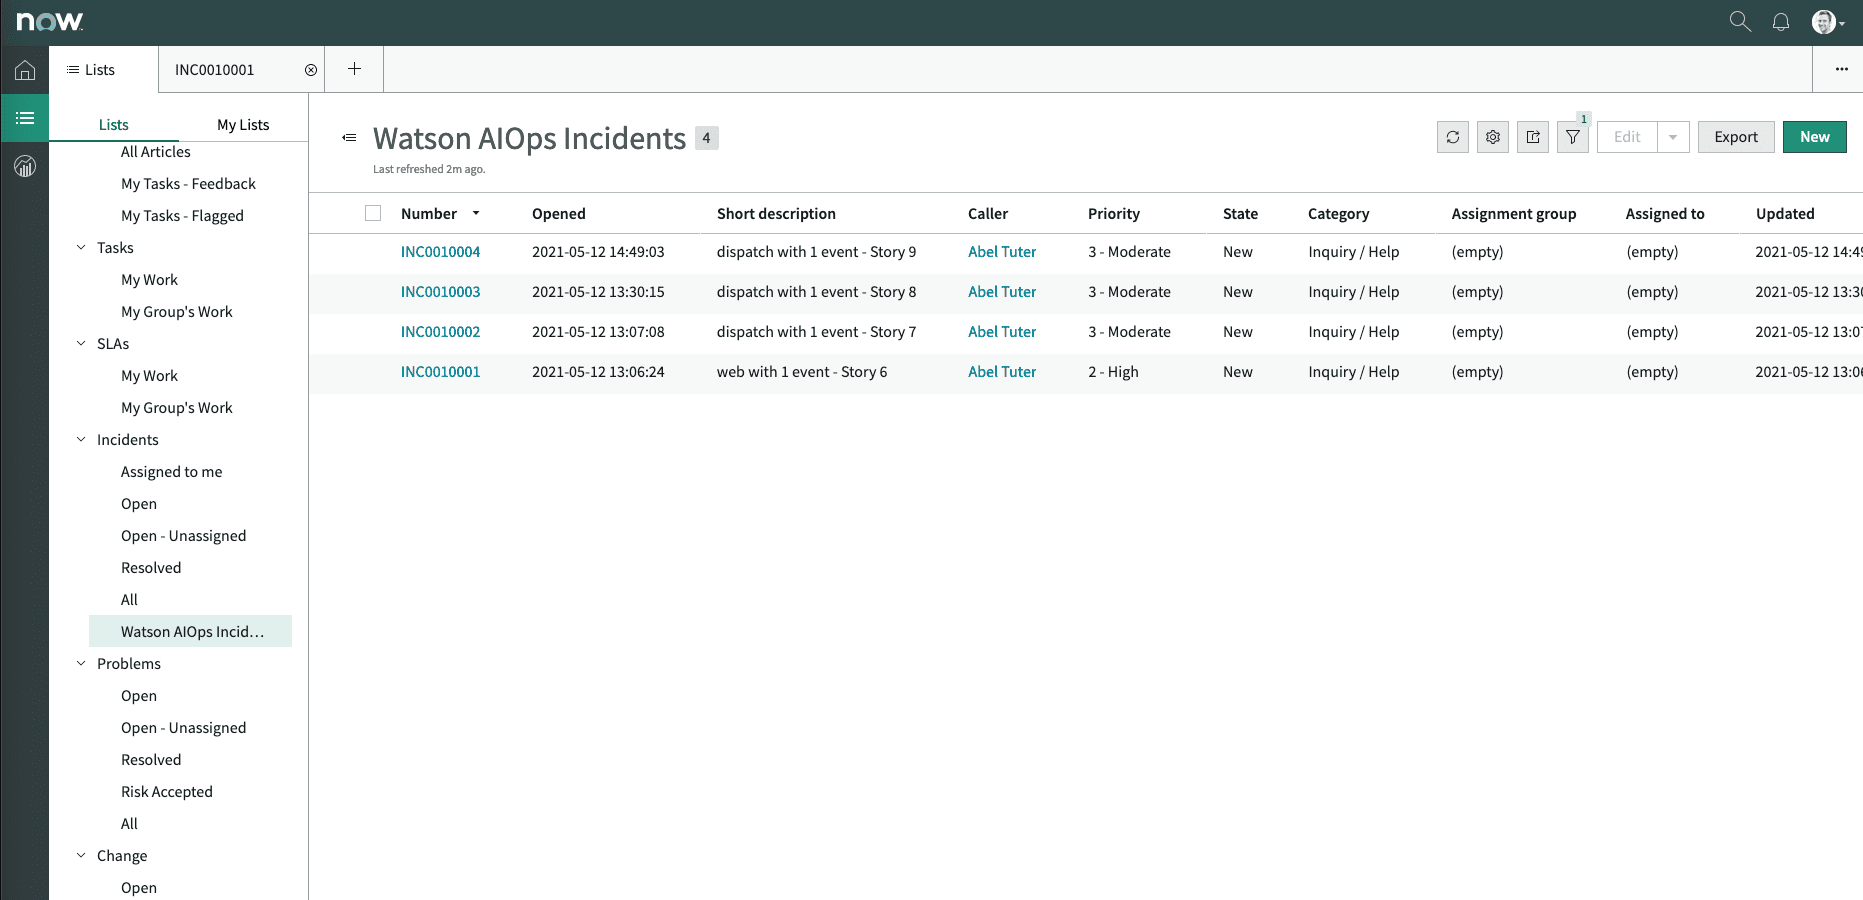
In the Agent Workspace, if you click on the burger menu and select CloudPak for AIOps Incidents, you will see the list of incidents created by CloudPak for AIOps as shown below
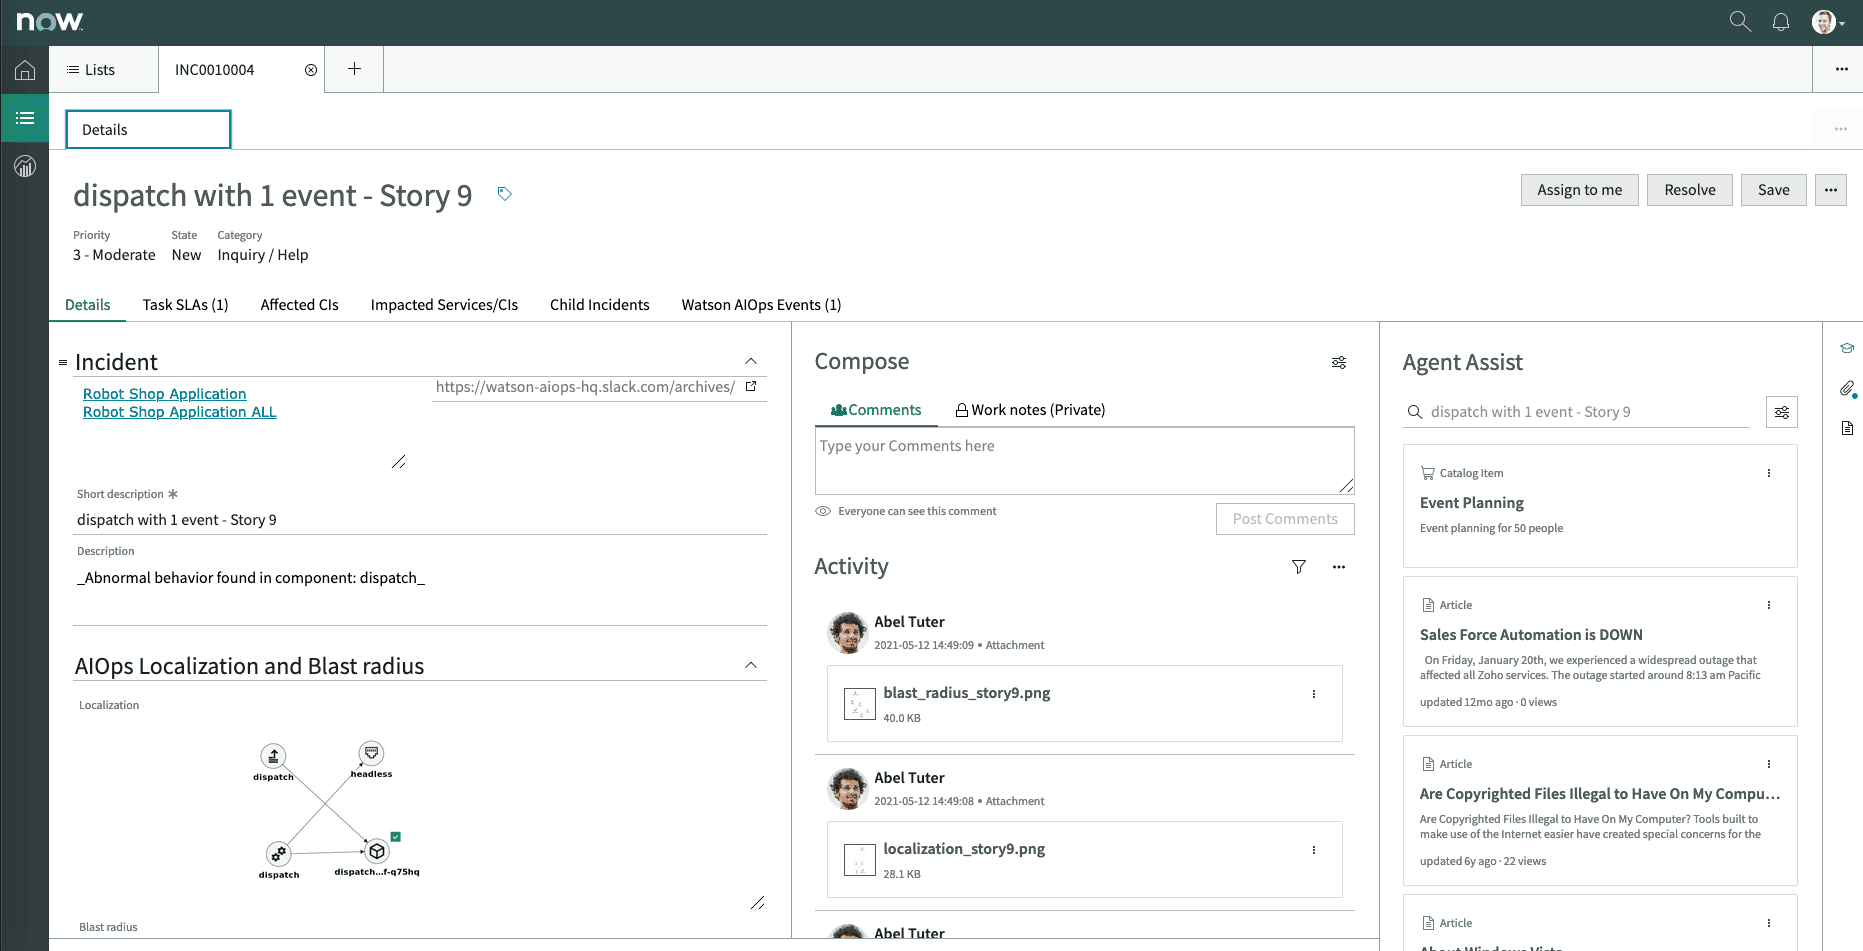
This is the incident in ServiceNow that corresponds to the story number 9 that was mentioned before
📥 STEP: Historical similar incidents
When an incident occurs, it can be helpful to review details for similar incidents to help determine a resolution. This AI model aggregates information about similar messages, anomalies, and events for a component or application. It can also extract the steps used to fix previous incidents, if documented. Training this AI model will help you discover historical incidents to aid in the remediation of current problems.
Important: Incidents in ServiceNow must contain meaningful entries in the Resolution notes (close_notes value in the logs) field to successfully populate the Search recommended actions feature in your ChatOps interface. If your incidents do not include resolutions, or include default entires like Closed by Caller, these values do not identify paths to remediation. As a result, empty or non-meaningful entries yield no results in your ChatOps interface because they provide no potential actions.
The process can be defined in the following steps:
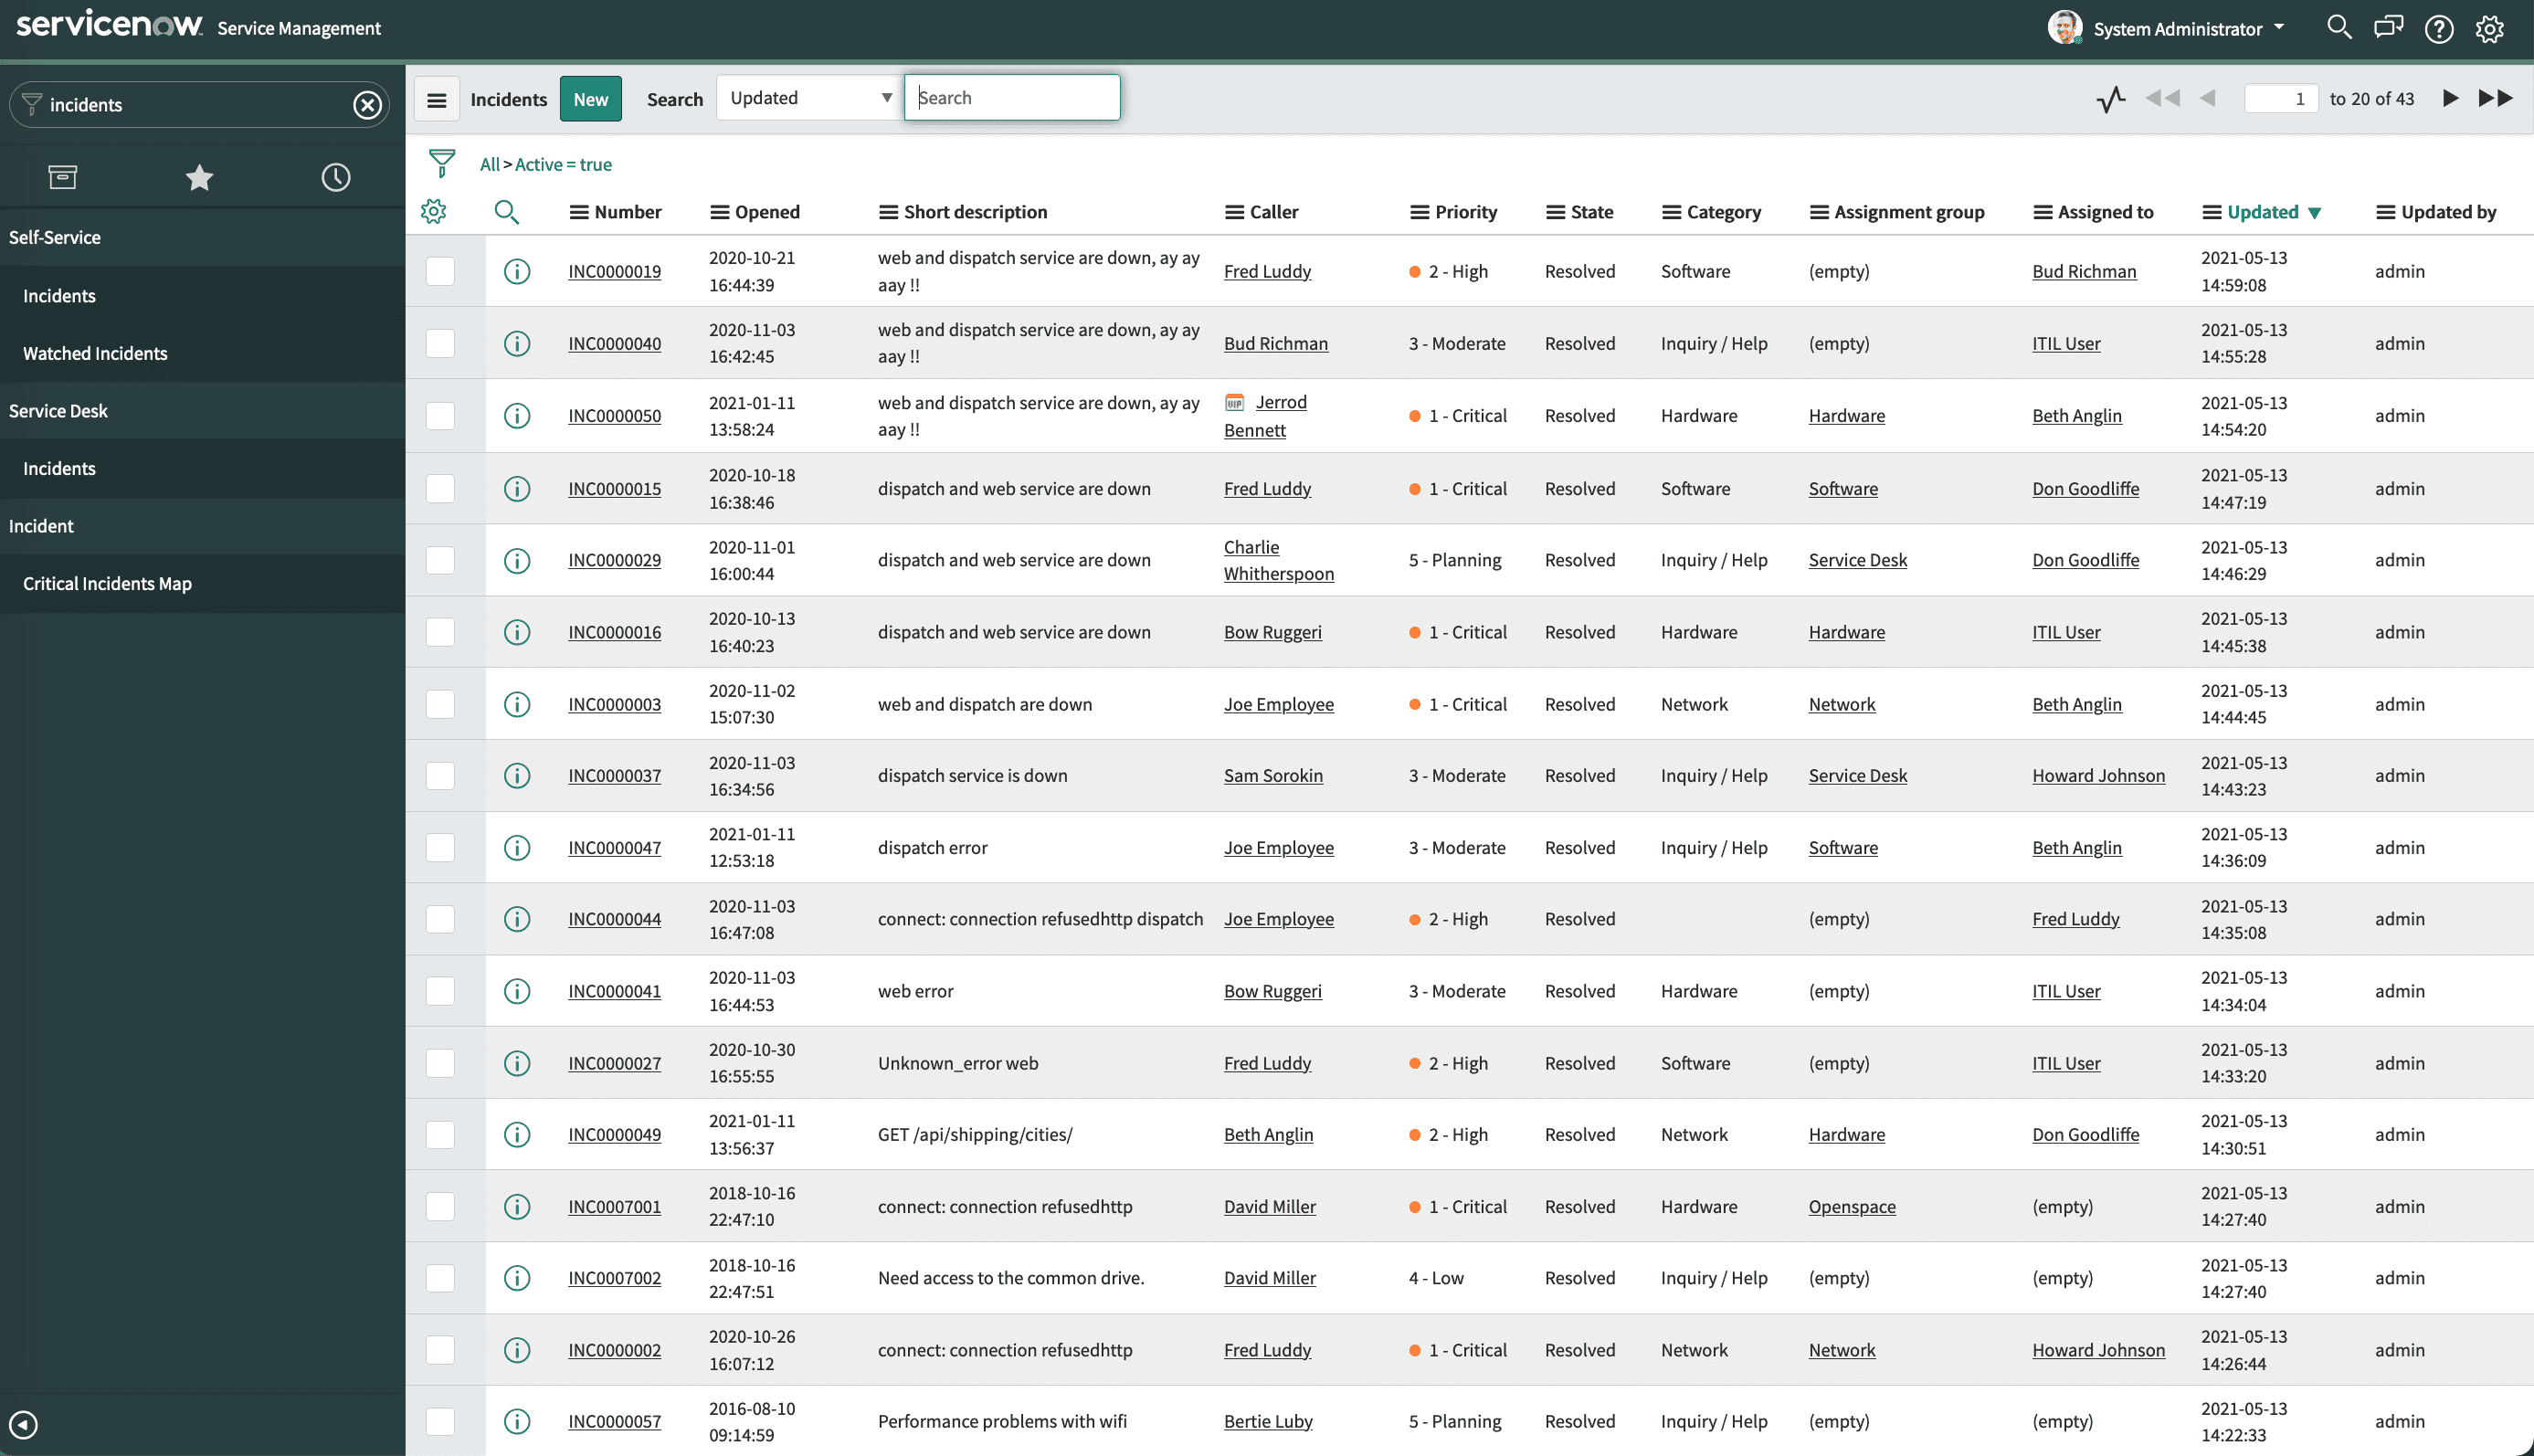
1) Change at least five existing incidents in your ServiceNow developer instance in order to match the stories you already have in Slack. To see the existing sample incidents in your ServiceNow developer instance search for incidents and select Service Desk -> Incidents as shown below
Select an existing open incident and update the description and short description with some known log anomaly error from an existing story. For example the next picture shows the description as “Unknown Error web”. Then click on the Resolution Information tab and Close the incident with resolution code Solved and fill the Resolution Notes with some resolution such as “web service was restarted”. Repeat this process for at least five tickets.

2) Now we can load the historical incidents data. We will verify that there is no incident data loaded yet by running the following command
<<<login into the cluster>>>oc exec -it `oc get pods|grep ai-platform-api-server|awk '{print $1;}'` bash
Now run the following CURL command
curl --insecure -u $ES_USERNAME:$ES_PASSWORD -X GET https://$ES_ENDPOINT/_cat/indices -k|sort|grep -e incident -e snowyellow open snowchangerequest tyEtirBzSh6sAgN6mVc51g 1 1 0 0 208b 208byellow open snowincident bEX48U3rT4GzpM0zt6Mgaw 1 1 0 0 208b 208b
As you can see there is no data yet.
We will enable the incident data flow now.
From the Home page click on Data and tool integrations.
Click on the ServiceNow integration and select Edit.
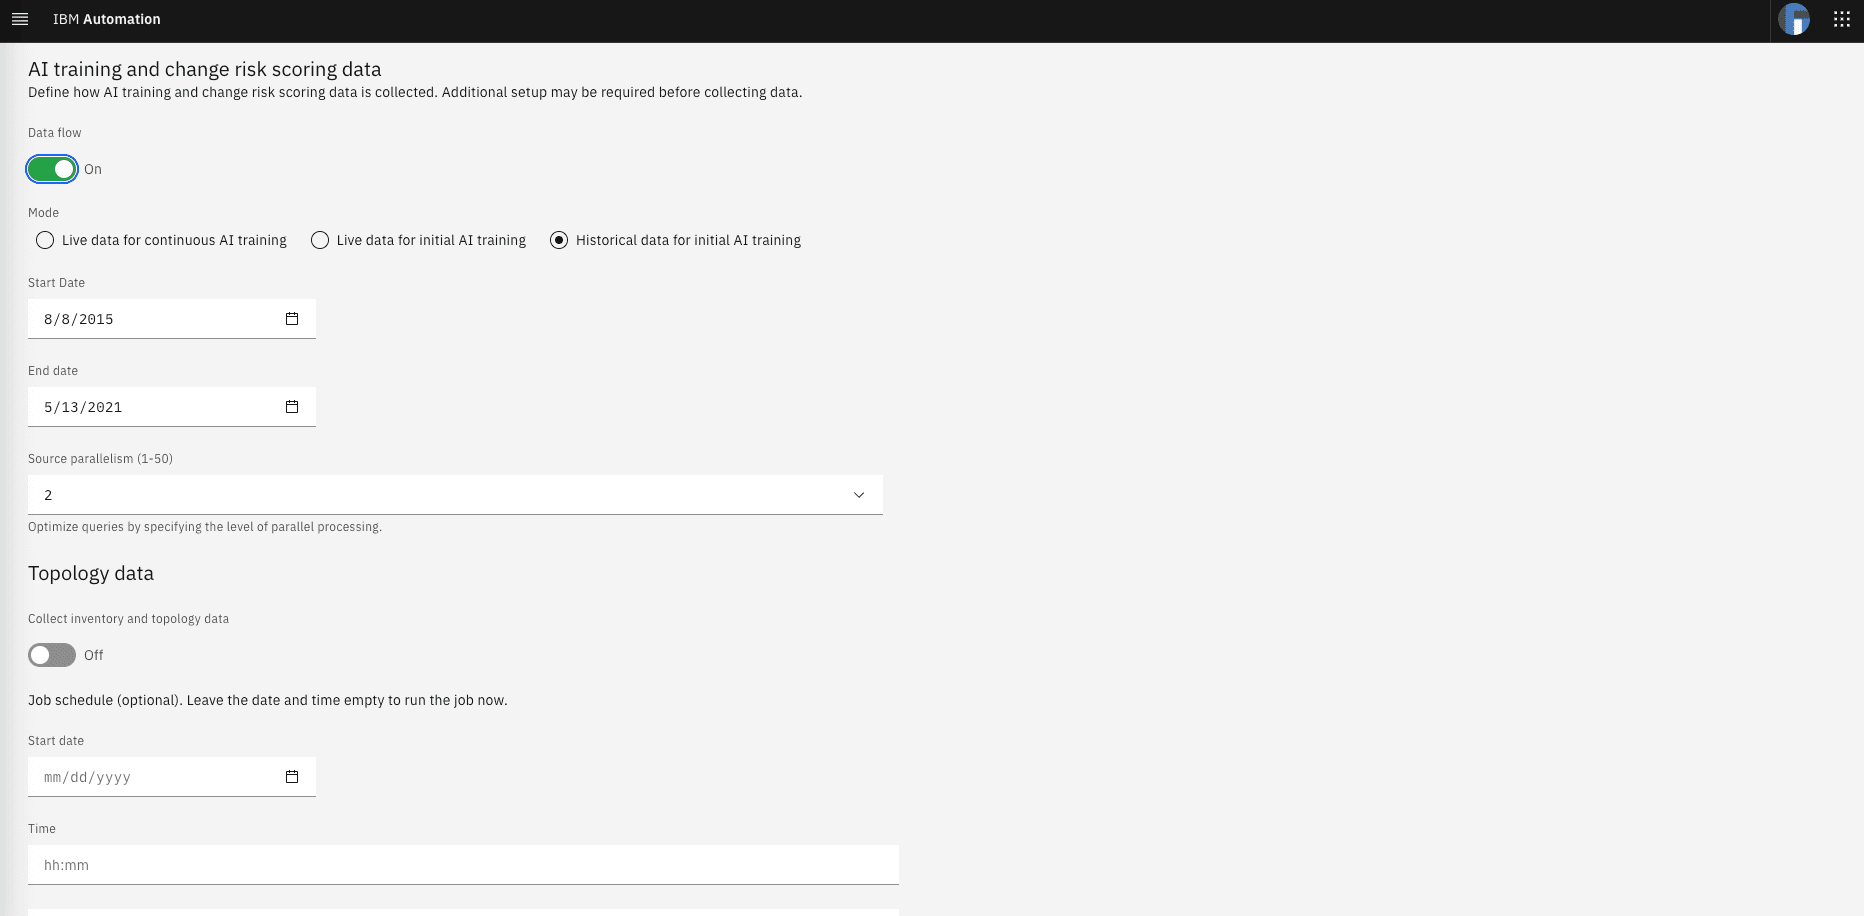
From the integration form, we will pull data by selecting “Data Flow” ON,
Check “Historical data for initial AI training” and
Select a start/end date to cover the existing sample incidents in the ServiceNow developer instance. In my instance this range was from 08/08/2015 until 05/13/2021. 1. Select 2 for “Source parallelism”. Keep topology Data off.
Click on the Save button at the bottom of the page.
Now incident data is being loaded into WAIOPS. Wait for an hour.
Note: this is a limitation of the vV3.1.1product in the sense that there is no feedback in the UI regarding how the data is being loaded or what data has been loaded already.
After an hour wait, we will verify that now there is indeed incident data loaded by running the same command:
<<<login into the cluster>>>oc exec -it `oc get pods|grep ai-platform-api-server|awk '{print $1;}'` bash
Now run the following CURL command
curl --insecure -u $ES_USERNAME:$ES_PASSWORD -X GET https://$ES_ENDPOINT/_cat/indices -k|sort|grep -e incident -e snowyellow open snowchangerequest tyEtirBzSh6sAgN6mVc51g 1 1 164 0 169.3kb 169.3kbyellow open snowproblem xBjP5lvrRYWOlidFd0X_Xw 1 1 2 0 123.2kb 123.2kbyellow open snowincident bEX48U3rT4GzpM0zt6Mgaw 1 1 138 0 280.8kb 280.8kb
As you can see there is incident data now loaded in elastic search. Now we need to disable the data flow. Click on the ServiceNow integration and select the 3dot menu on the far right and select “Disable Ticket Data Flow”.
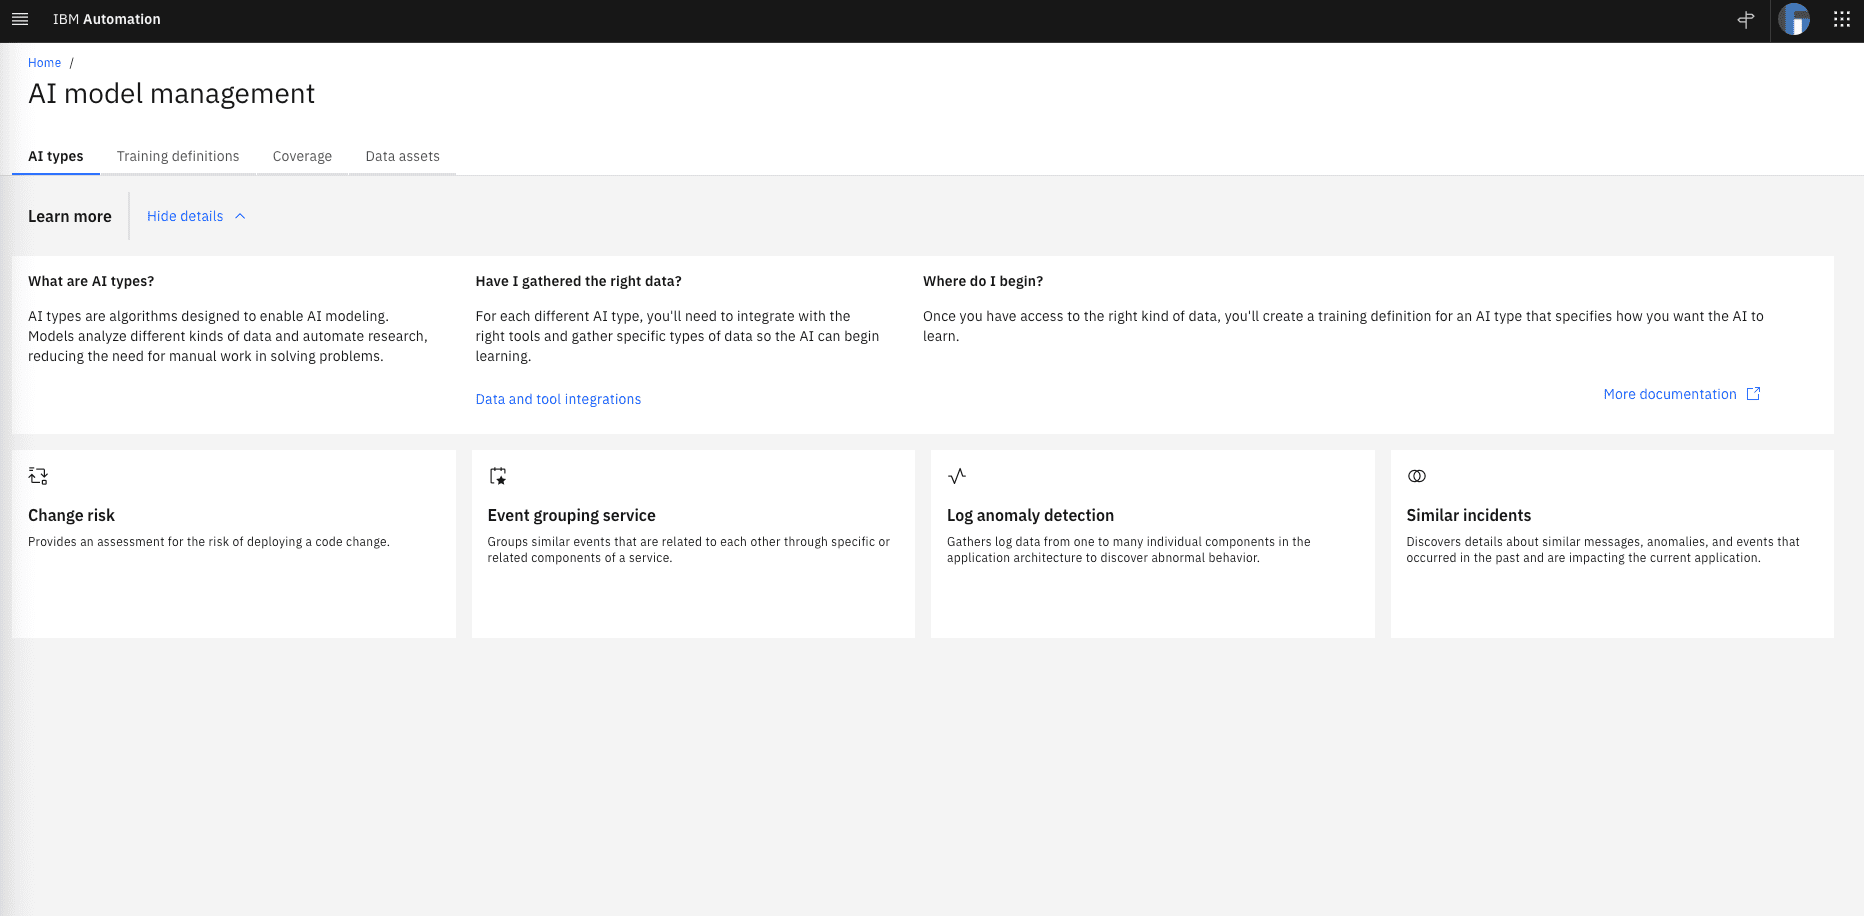
3) Now its time to use that data for historical similar incident training. Click AI Model Management from the Home page and select the Similar Incidents card as shown below.
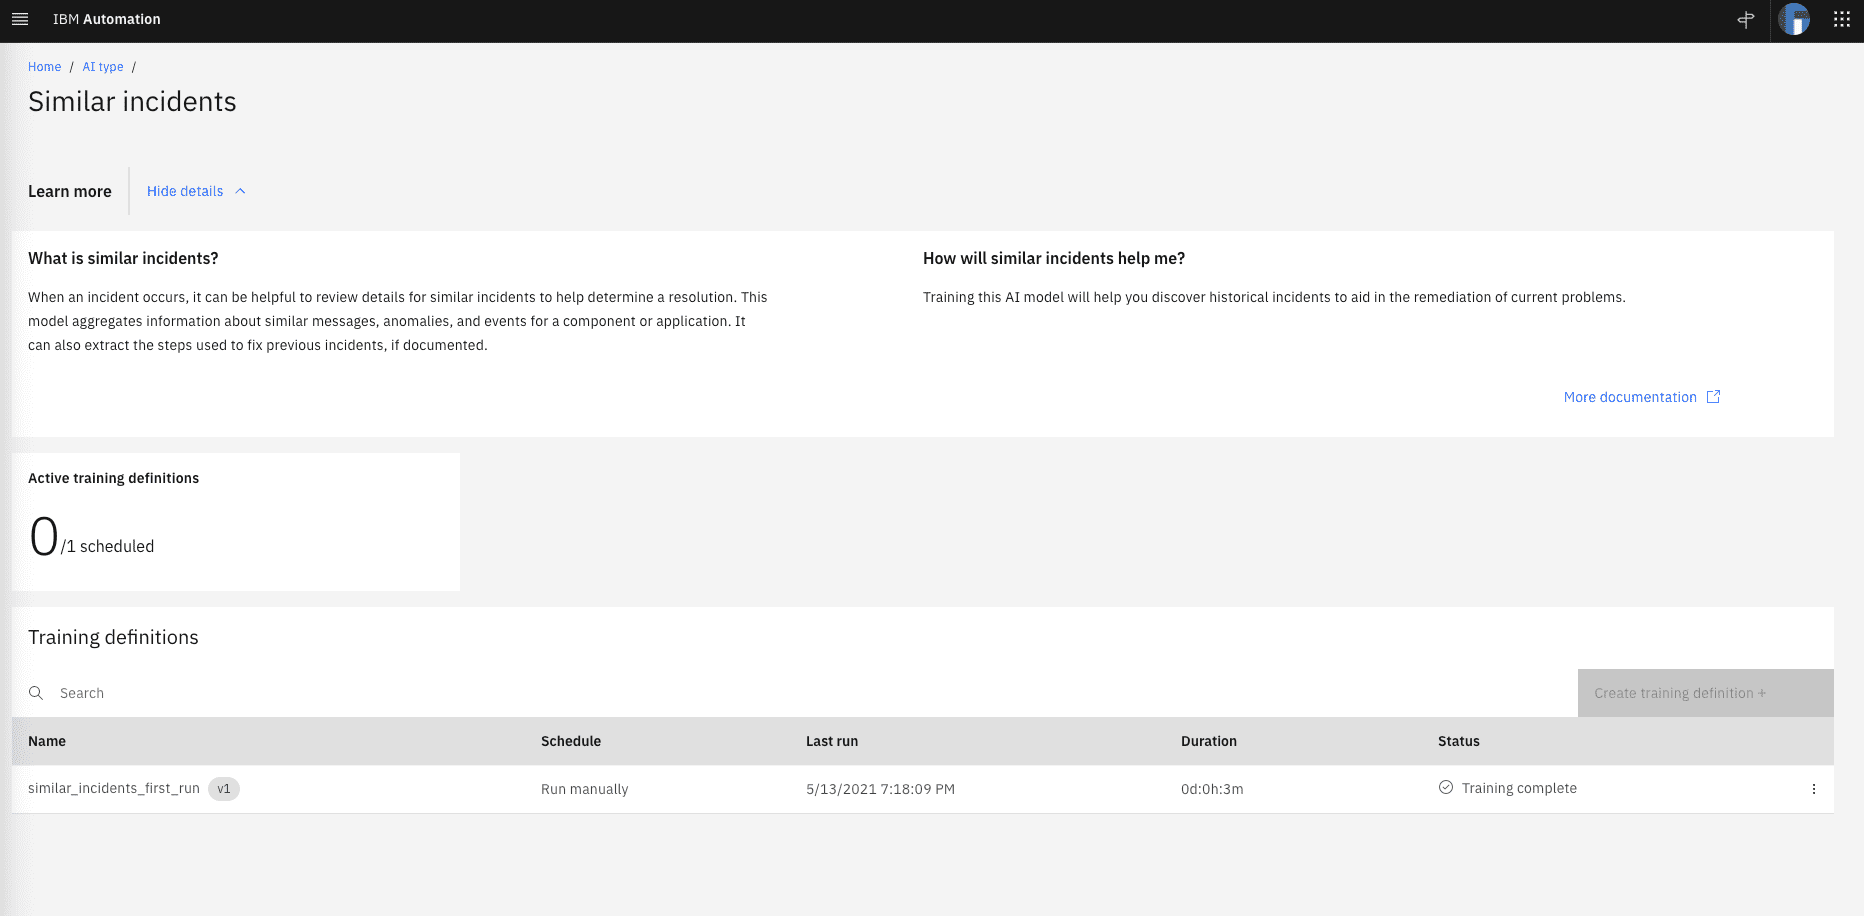
Create a training definition by clicking on the Create Training Definition button. Select “manually” for the schedule option and click save. The next picture shows a training definition (not that in this case it has already been used for training)
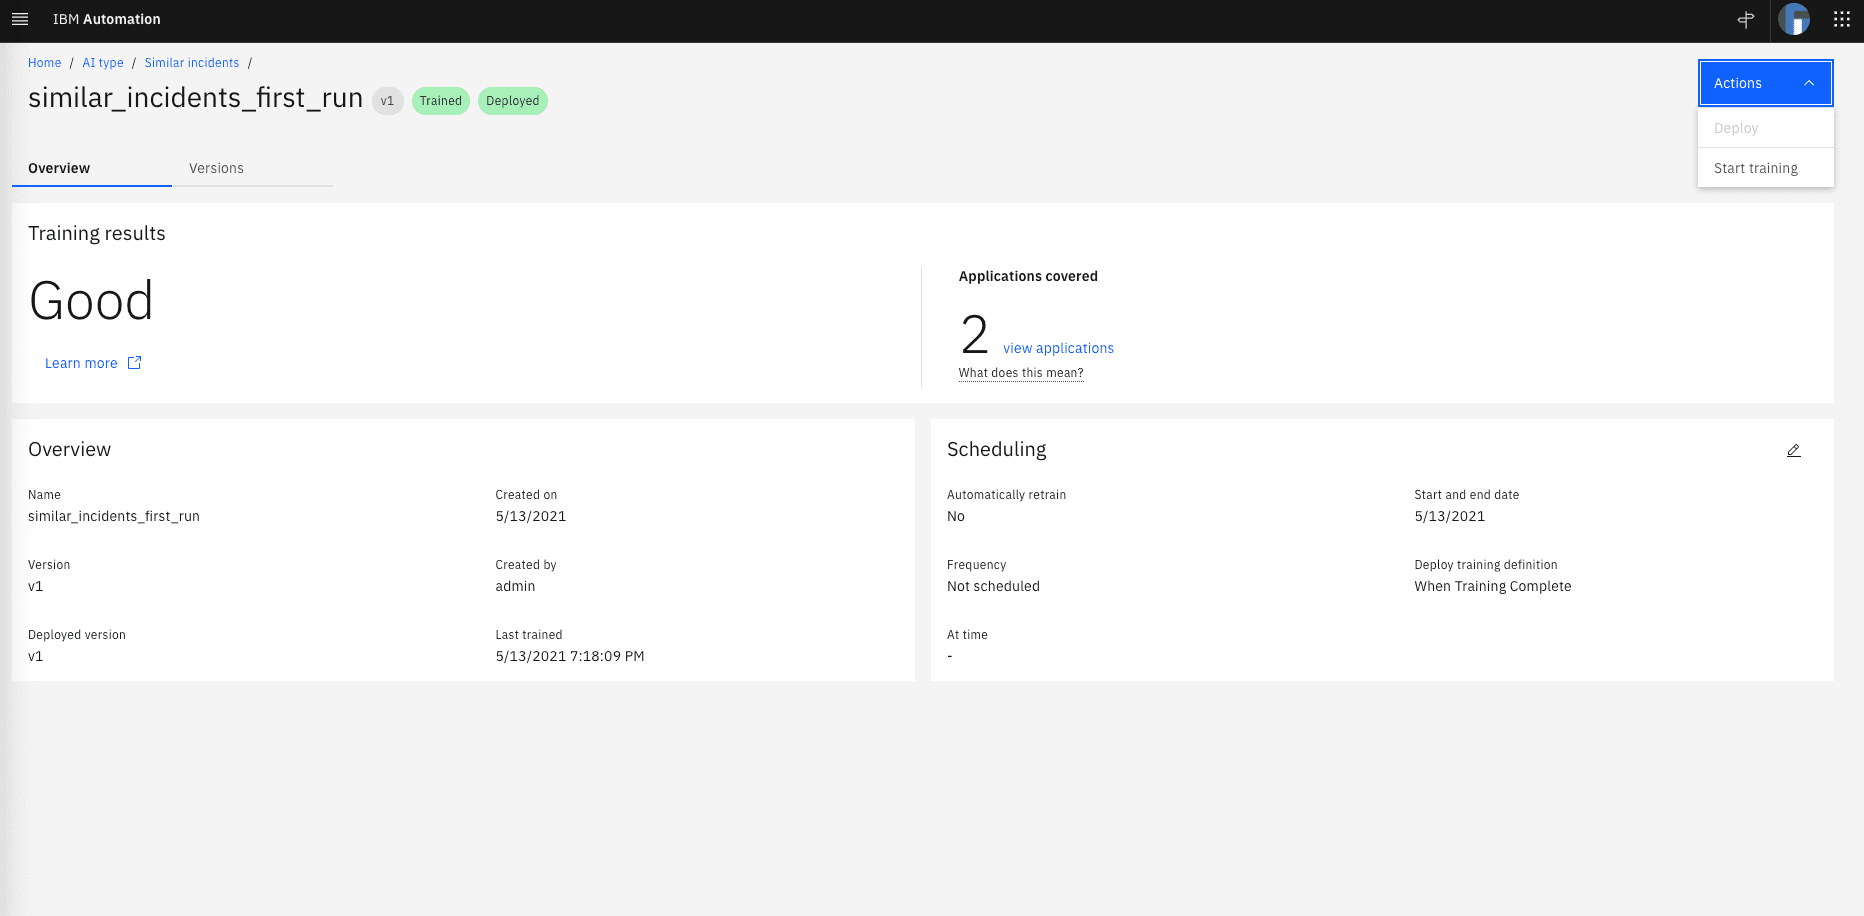
Now its time to run the training. From the top right Actions menu select Start Training. After some time, you will the training results and the confirmation that the model has been deployed as shown in the next picture:
Now, lets take a look at elastic search again and see if the new model is there. Run the following commands:
<<<login into the cluster>>>oc exec -it `oc get pods|grep ai-platform-api-server|awk '{print $1;}'` bash
Now run the following CURL command
curl --insecure -u $ES_USERNAME:$ES_PASSWORD -X GET https://$ES_ENDPOINT/_cat/indices -k|sort|grep -e incident -e snowyellow open 1000-1000-incident_models_latest DEFV7jFXQcO9j16w9wg3Wg 1 1 1 0 4kb 4kbyellow open incident-train-last-timestamp qZBKSzkyR528ou48vR3O3g 1 1 1 0 3.5kb 3.5kbyellow open incidenttrain _mI7aKfSSgi9EFPfPln-eQ 1 1 88 0 141.1kb 141.1kbyellow open normalized-incidents-1000-1000 dknPqXemSjyfYbTXPeJ91Q 1 1 44 0 82.9kb 82.9kbyellow open snowchangerequest tyEtirBzSh6sAgN6mVc51g 1 1 246 0 271kb 271kbyellow open snowincident bEX48U3rT4GzpM0zt6Mgaw 1 1 207 0 456.7kb 456.7kbyellow open snowproblem xBjP5lvrRYWOlidFd0X_Xw 1 1 3 0 241.2kb 241.2kb
As you can see, there is a new model created for incidents.
Finally, lets use the new model by running the Search Similar Incidents functionality from an existing story in Slack. Select a story that has a reference to the updated incident you did previously and click on Search Similar Incident button
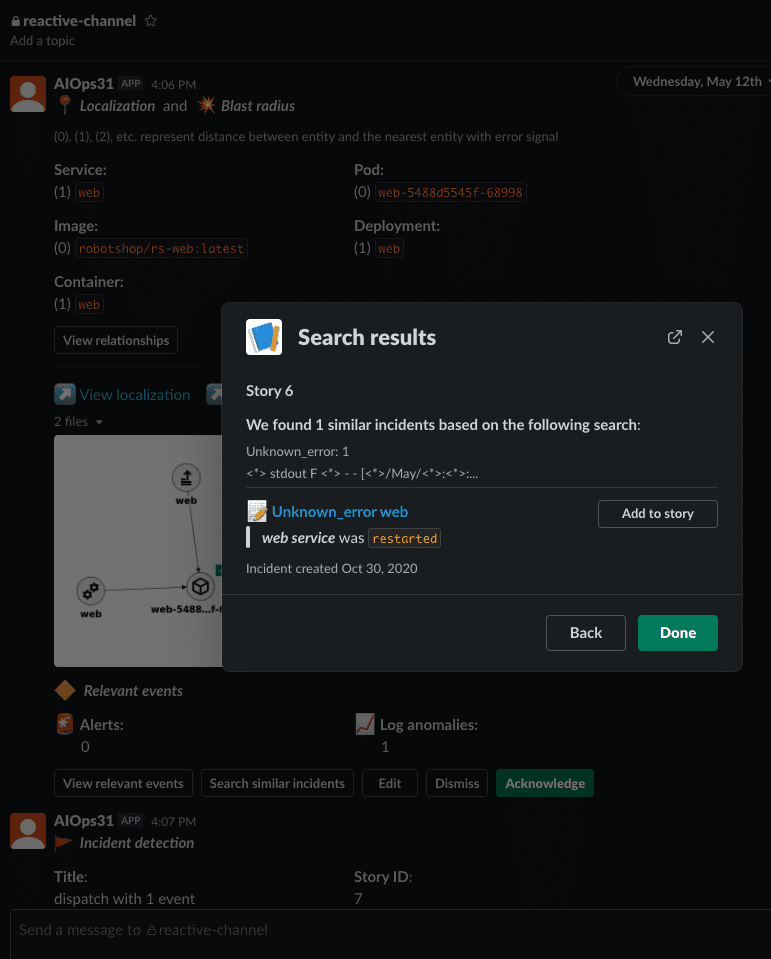
As we can see in the previous picture, when we click search, a historical incident is found and a summary of the ticket resolution activities are shown. You can click on the text in blue to go to the actual ticket in your ServiceNow developer instance.
📥 STEP: Pulling inventory and topology data from ServiceNow
Using the WAIOPS ServiceNow Observer job, you can retrieve the Configuration Management Database (CMDB) data from ServiceNow. The ServiceNow developer instance comes loaded with sample topology and inventory data. In this section, we will define an observer job to pull this information into WAIOPS, that can be later be seen from the Topology Viewer.
ServiceNow CMDB
The ServiceNow Configuration Management data base creates and maintains the logical configurations the network infrastructure needs to support a ServiceNow service. These logical service configurations are mapped to the physical layout data of the supporting network and application infrastructure in each of the respective domains. They track the physical and logical state of IT service elements and associate incidents to the state of service elements, which helps in analyzing trends and reducing problems and incidents. The configurations are stored in a configuration management database which consists of entities, called Configuration Items (CI), that are part of your environment. A CI may be:
- A physical entity, such as a computer or router
- A logical entity, such as an instance of a database
- Conceptual, such as a Requisition Service
A CI does not exist on its own. CIs have dependencies and relationship with other CIs. For example, the loss of disk drives may take a database instance down, which affects the requisition service that the HR department uses to order equipment for new employees.
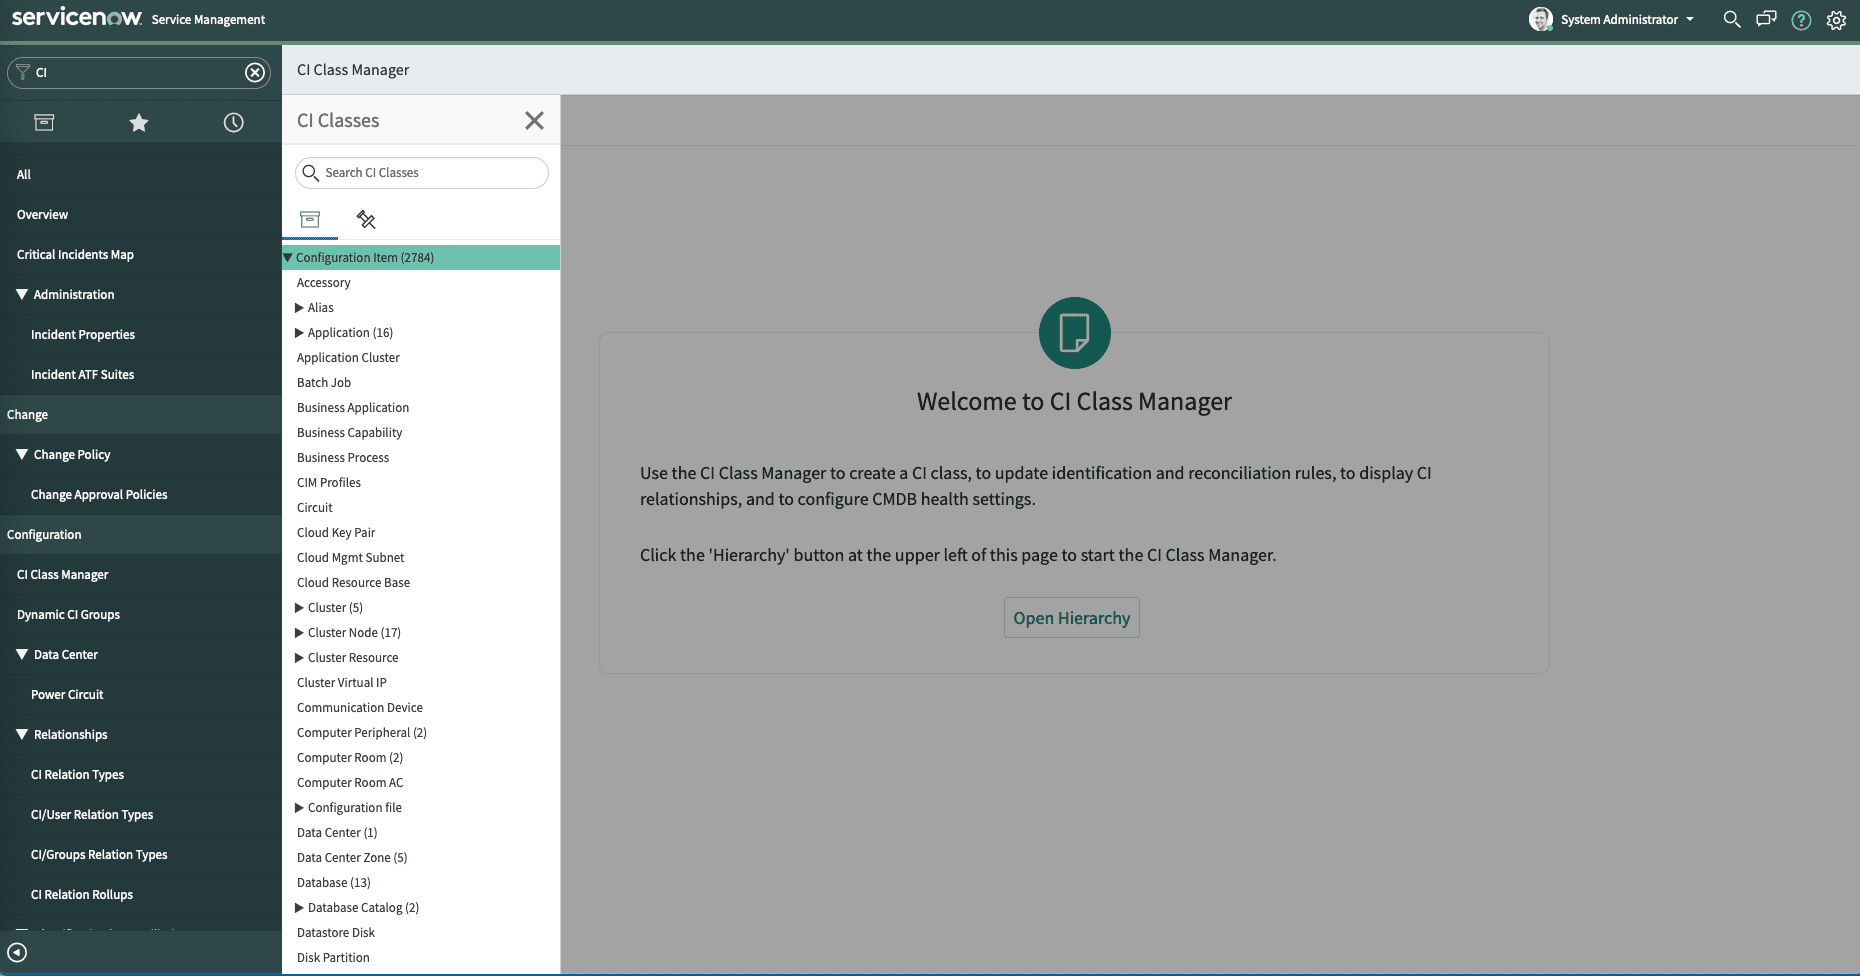
In order to see existing CMDB data in ServiceNow, from the developer instance home page, from the top left you can search for CI, click on CI Class Manager and click the ‘Hierarchy’ button at the upper left of this page to start the CI Class Manager.
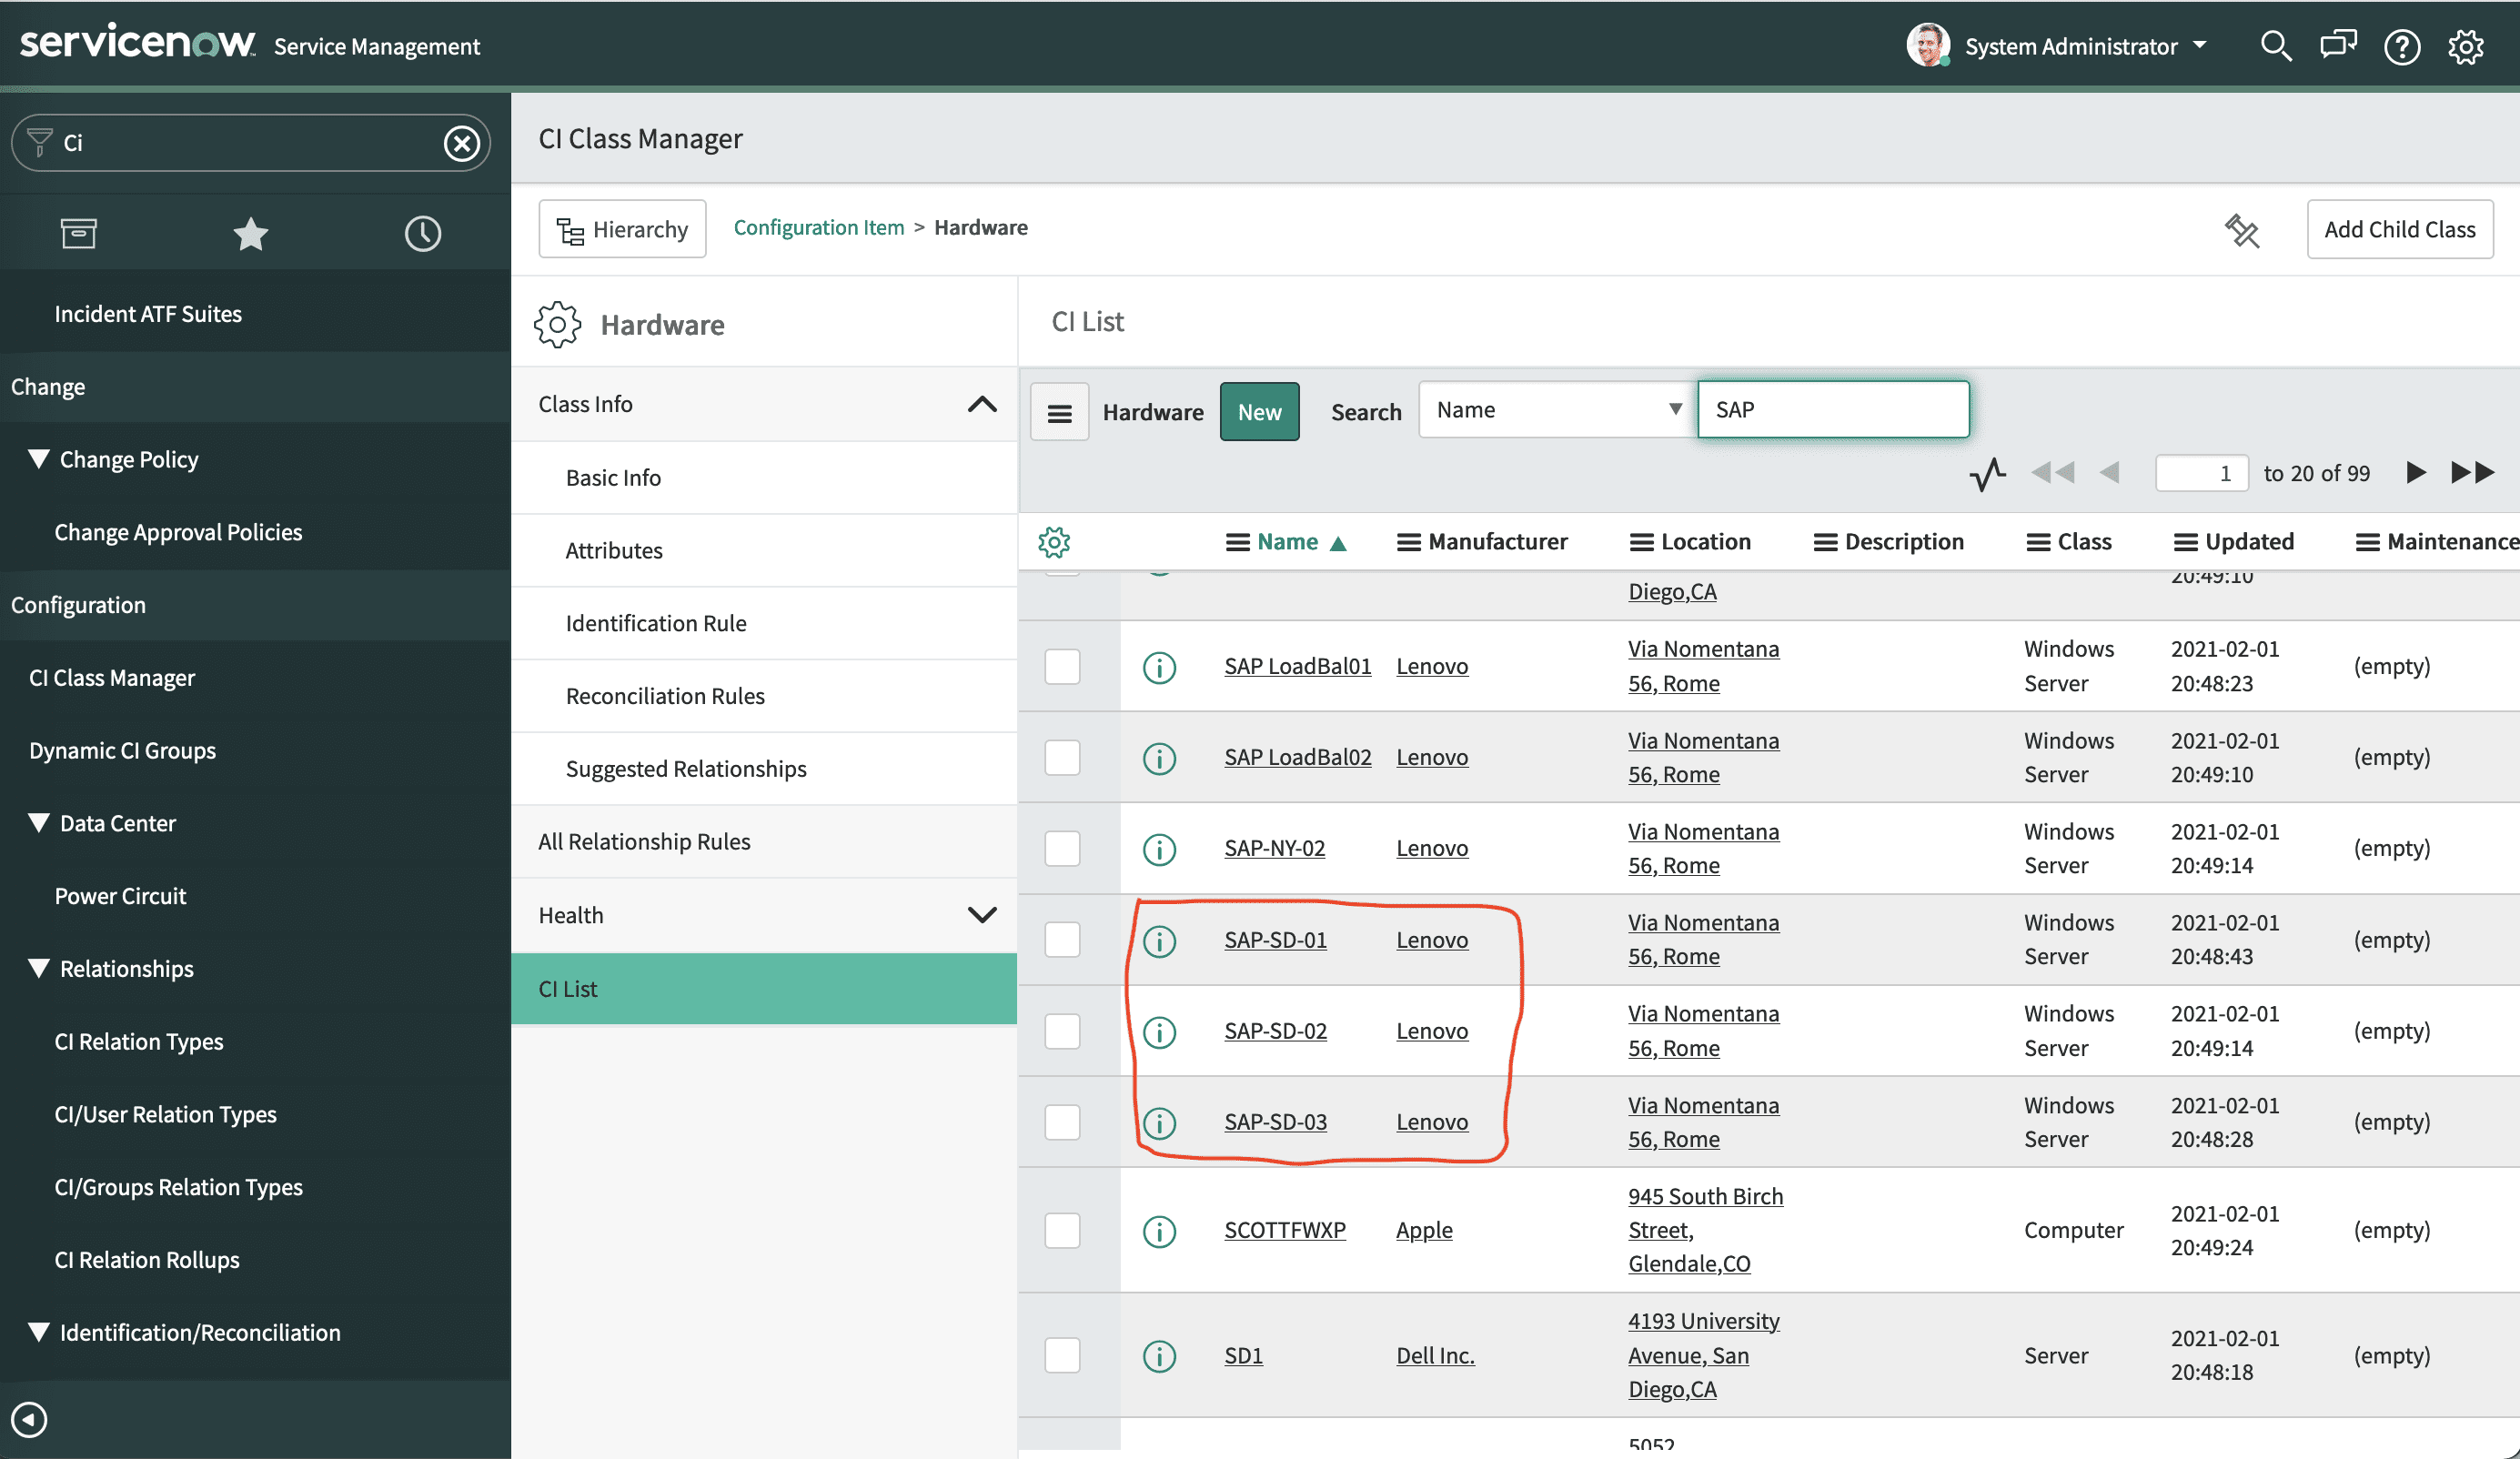
For example, on the CI Classes column, click on Hardware, select the CI List to see the actual items and search for SAP. You will find a number of SAP servers own by the Lenovo Organization as shown below. We will see these same SAP servers later in the Topology Viewer in WAIOPS.
ServiceNow Observer Job
In CP4AIOPS there are two ways to enable a ServiceNow observer job: the first way is inside the ServiceNow main integration form and the second way is as a regular observer job. In this cookbook, we will follow the second option.
From the WAIOPS home page, click on Data and tool integrations, then click on the Advanced tab and finally select Manage observer jobs. You will see the list of available observers after you click on the Add a new job card as shown below (note that the number of observer cards will vary depending on what observers are enabled in your WAIOPS instance)
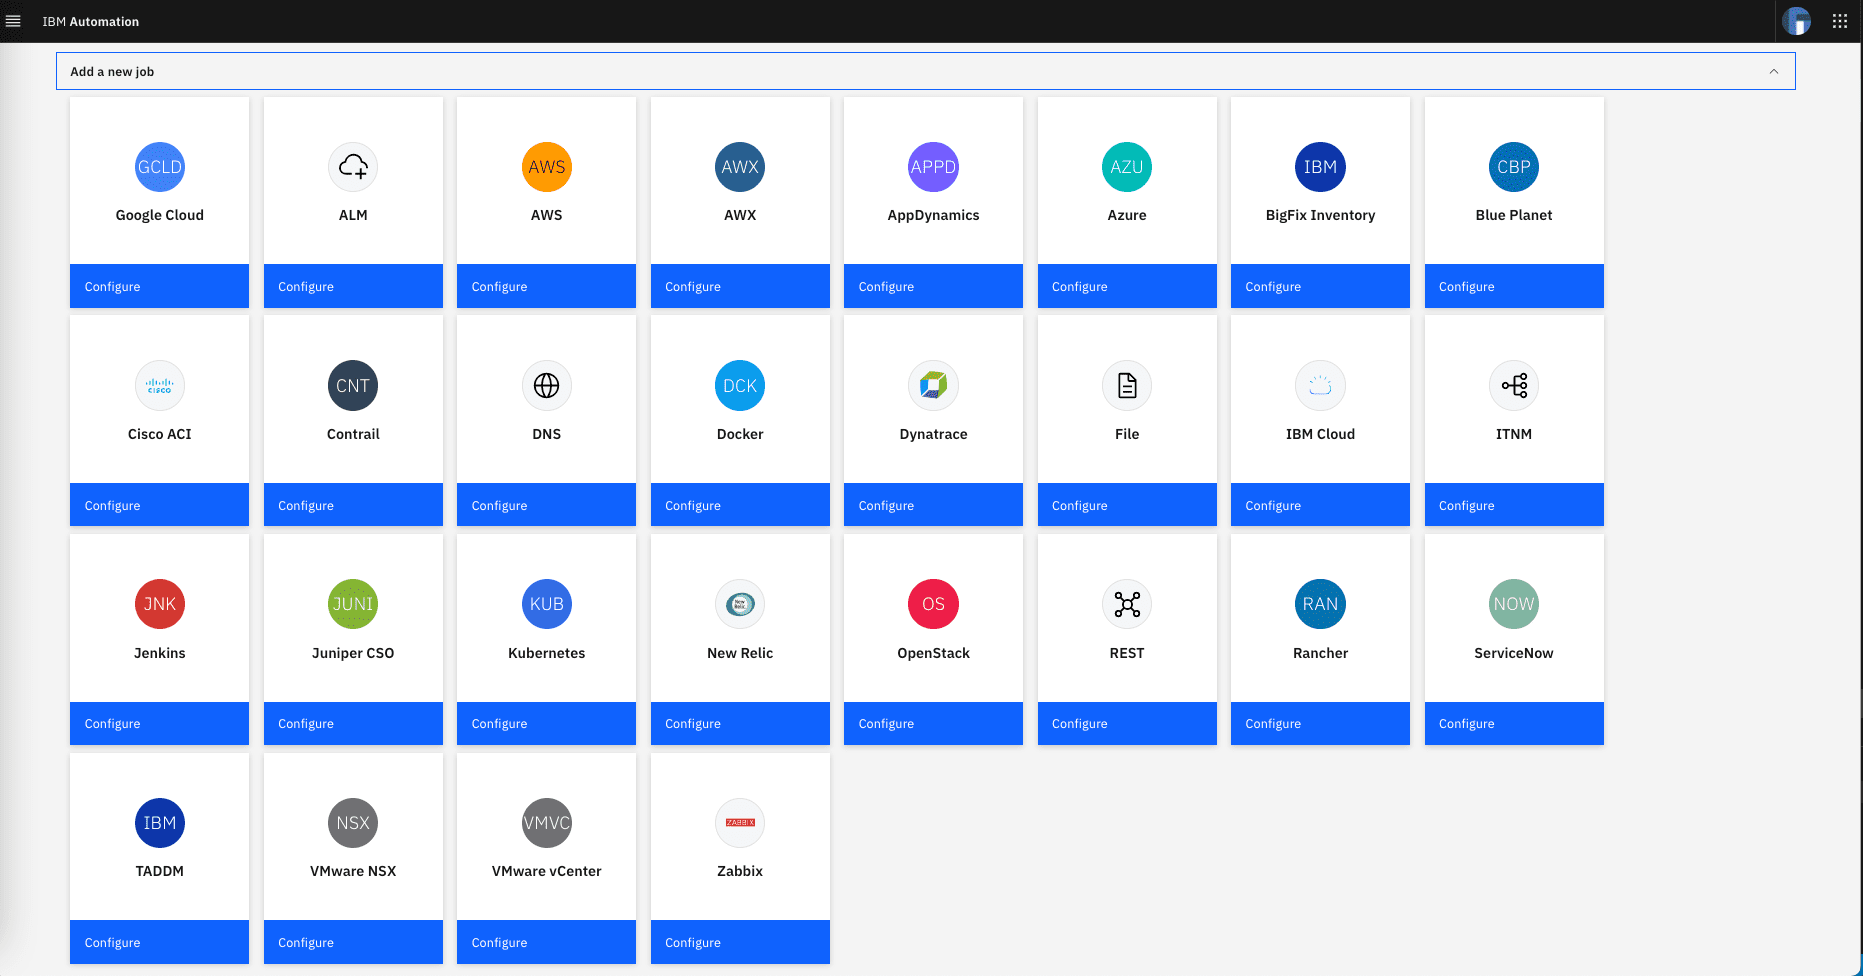
Click on the ServiceNow card and complete the observer job form as shown below:
- Unique ID: Be sure to give your job a unique name so you can recognize it in the future.
- ServiceNow instance: Specify the URL of the ServiceNow developer instance.
- ServiceNow username: Specify the same ServiceNow events user username you configured before under the Creating ServiceNow integrations section.
- ServiceNow password: Specify the same encrypted password you configured before under the Creating ServiceNow integrations section.
Leave the optional Additional parameters section unchanged. Click on the Job schedule section and confirm that Run time is set to now and Time interval as once only
The following screenshot shows the complete form:
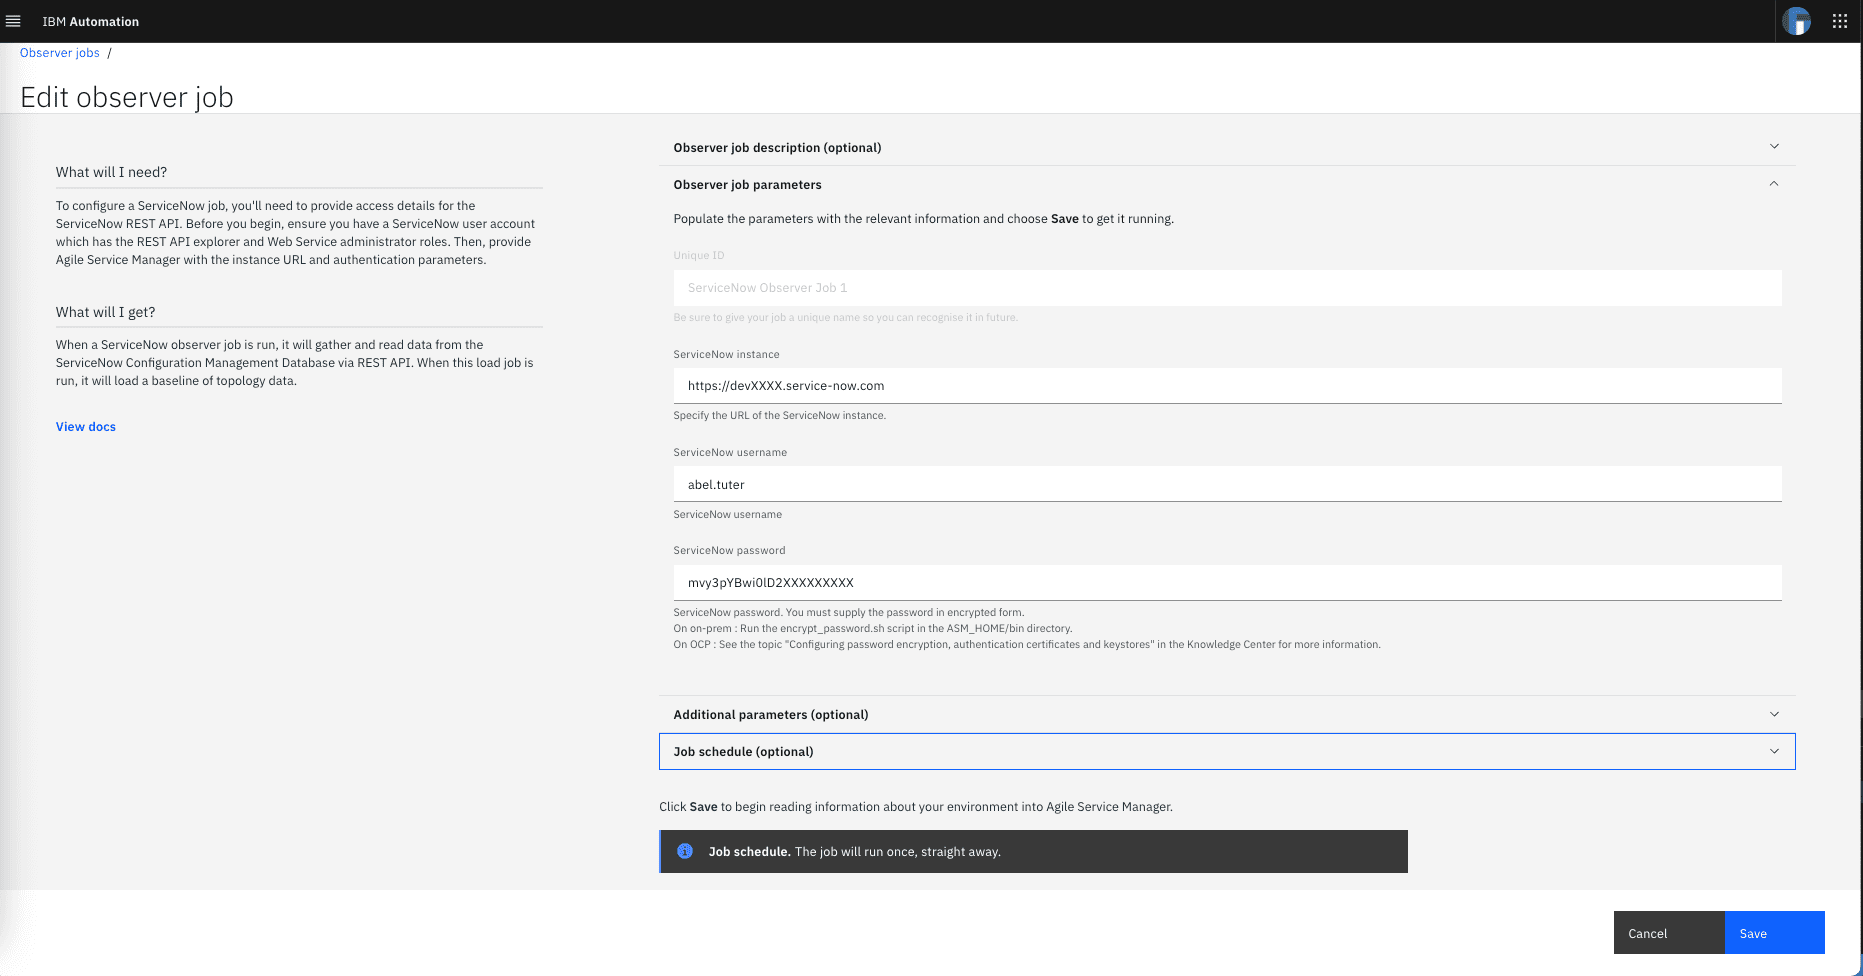
Finally click on Save to save the observer job configuration and run the job. This job will pull all the existing topology and inventory data from your ServiceNow developer instance into WAIOPS.
ServiceNow Observer Job logs
After you let the job run, lets check the logs of the observer pod by running the following command:
oc logs `oc get pods|grep servicenow-observer|awk '{print $1;}'` > servicenow-observer-logs.txt
Open the log output file servicenow-observer-logs.txt and verify that you see log lines like those shown below:
INFO [2021-05-21 19:08:45,222] [dw-28 - POST /1.0/servicenow-observer/jobs/load] c.i.i.t.o.a.JobPostApi - dw-28 - POST /1.0/servicenow-observer/jobs/load - submitJobRequest - Accepted job id: DcXec2deRKyC4GbcHmygew, name: ServiceNow Observer Job 1, for scheduling.INFO [2021-05-21 19:08:45,298] [pool-12-thread-1] c.i.i.t.k.c.a.ConsumerWorker - Consumer topic [itsm.nodes.json] Read 2 records from KafkaINFO [2021-05-21 19:08:45,301] [pool-12-thread-1] c.i.i.t.o.p.ResourceUploadPluginManager - Change of {"keyIndexName":"servicenow-observer-provider","name":"servicenow-observer-provider","entityTypes":["provider"],"vertexType":"mgmtArtifact","_id":"VD6JvpGcMrUUbsKfYyucXQ"}...INFO [2021-05-21 19:08:51,808] [Fetch:cmn_department] c.i.i.t.o.s.a.r.ServiceNowRestApi - Fetched records 1 to 7 of /api/now/table/cmn_department from a total 7 recordsINFO [2021-05-21 19:08:52,057] [Fetch:cmn_department] c.i.i.t.o.s.a.r.ServiceNowRestApi - Process all 7 records for /api/now/table/cmn_department...INFO [2021-05-21 19:08:59,722] [Fetch:cmdb_ci] c.i.i.t.o.s.a.r.ServiceNowRestApi - Fetched records 1 to 2784 of /api/now/table/cmdb_ci from a total 2784 records...
Verify Data in Topology Viewer
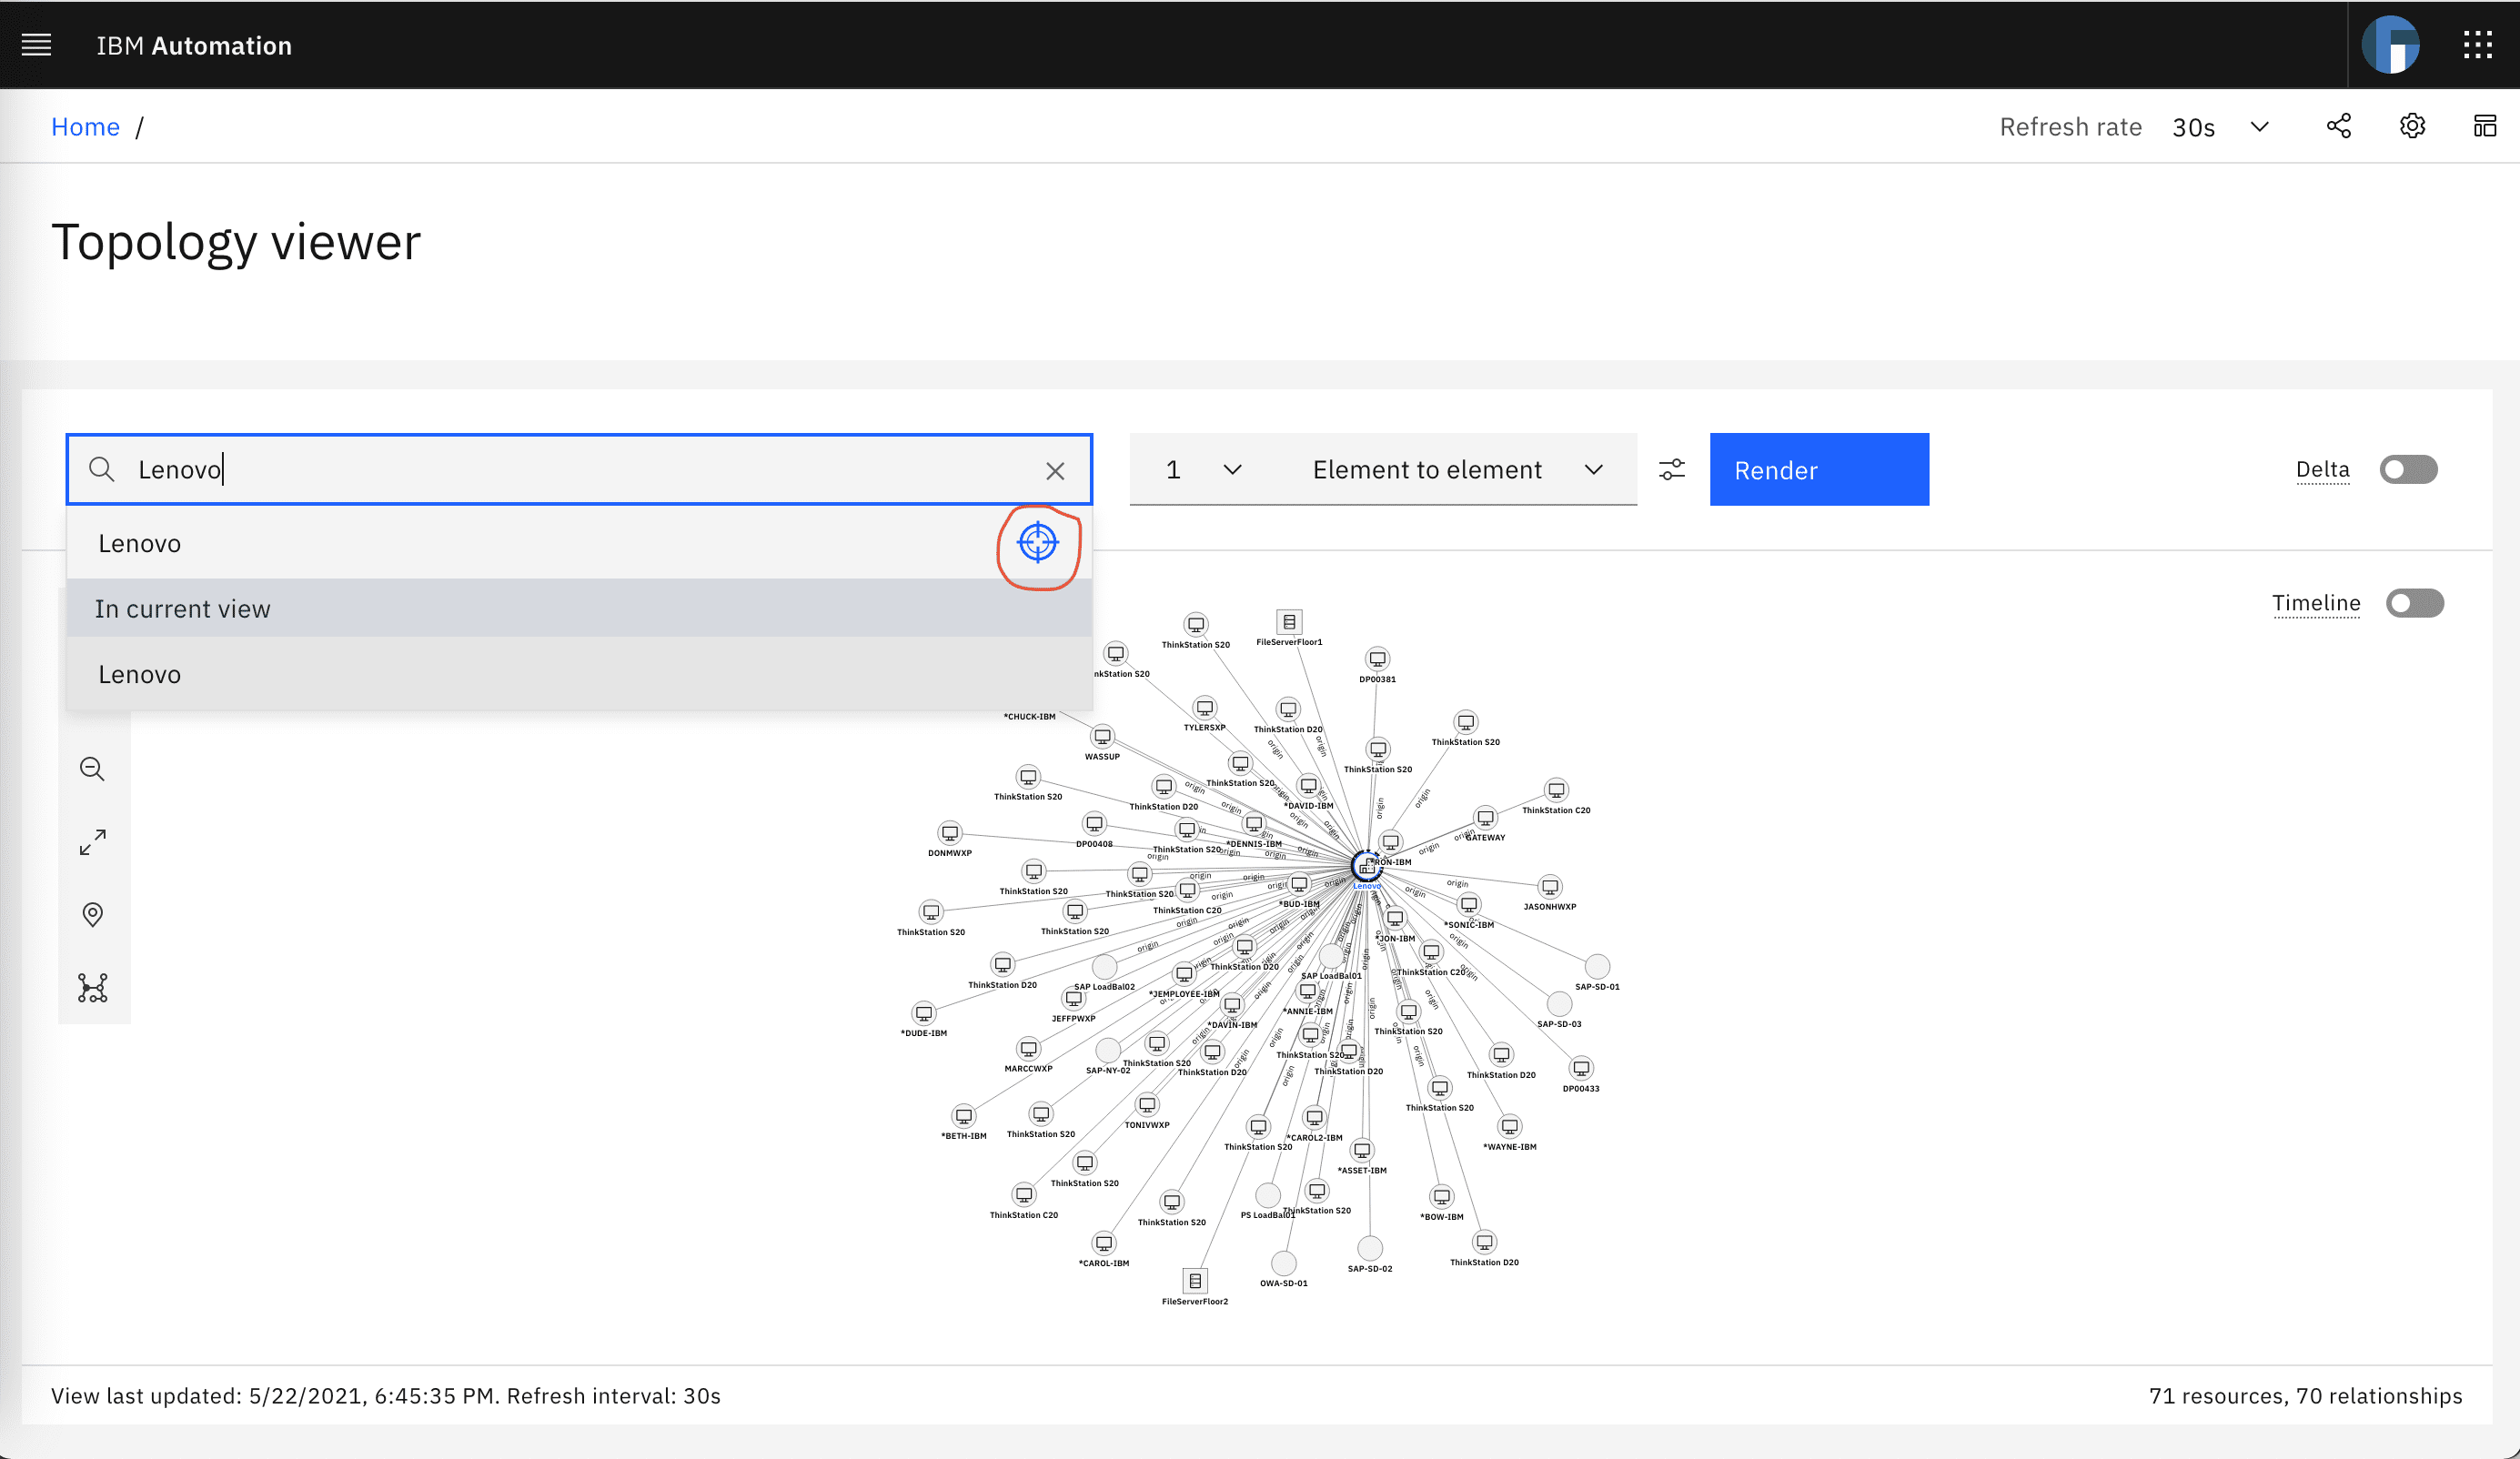
Finally, lets verify the ServiceNow inventory and topology data in the Topology Viewer. From the WAIOPS home page click on Topology viewer and search for Lenovo and click on the search result blue target. You will see that the topology for the ServiceNow Organization Lenovo is shown. If you zoom-in, you will see that this topology includes the SAP servers (SAP-SD-01, SAP-SD-02, etc) we saw before in ServiceNow.
📥 STEP: Encrypting the Service Now Password
Important: You must specify an IBM CloudPak for AIOps encrypted version of your ServiceNow password to collect inventory and topology data from ServiceNow. To encrypt your ServiceNow password, complete the following steps:
Make sure that you have oc installed on your local system. For more information about these requirements, see Preparing to install IBM CloudPak for AIOps. Log in to your Red Hat OpenShift Container Platform cluster by using the oc login command. You can identify your specific oc login by clicking the user name dropdown menu in the Red Hat OpenShift Container Platform console, then clicking Copy Login Command.
Switch your project to where the CloudPak for AIOps is installed (e.g. ibm-aiops) using the following command (use your own project name):
oc project ibm-aiops
- Identify the full name for the evtmanager-topology-topology pod:
oc get pods | grep evtmanager-topology-topology
- Enter the following command to encrypt your password. The content of <your_password> is your unencrypted ServiceNow password.
oc exec -ti evtmanager-topology-topology-<xxxxxxxxx-xxxxx> -- java -jar /opt/ibm/topology-service/topology-service.jar encrypt_password -p '<your_password>'
- Copy and paste the results of the preceding command (your encrypted ServiceNow password) in this field.