Security Tooling
Security Tooling
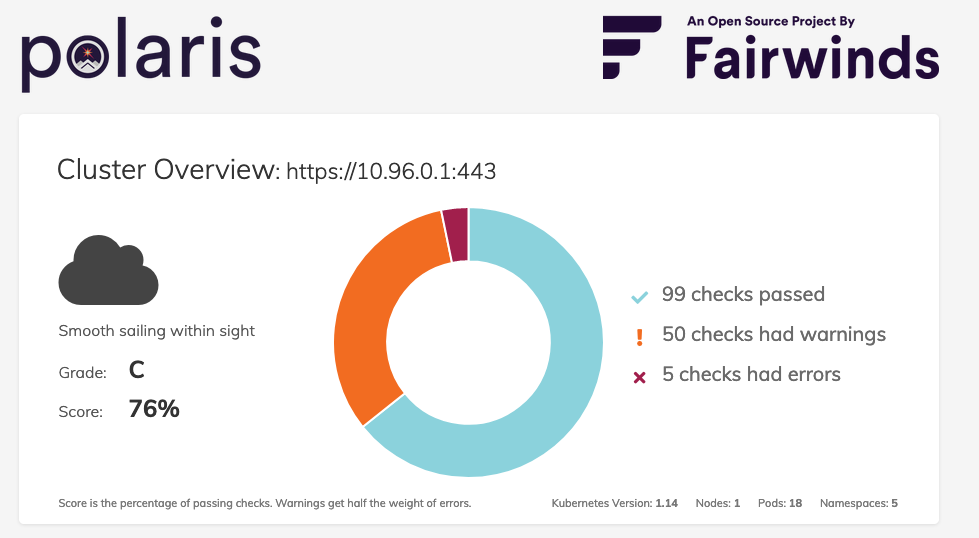
Polaris
Polaris runs a variety of checks to ensure that Kubernetes pods and controllers are configured using best practices, helping you avoid problems in the future.
You can get more details here.
Install Polaris Dashboard by running:
kubectl apply -f ./tools/polaris.yaml> namespace/polaris created> configmap/polaris created> serviceaccount/polaris-dashboard created> clusterrole.rbac.authorization.k8s.io/polaris-dashboard created> clusterrolebinding.rbac.authorization.k8s.io/polaris-dashboard created> service/polaris-dashboard created> deployment.apps/polaris-dashboard createdWait until the pod si running:
kubectl get pods -n polaris> NAME READY STATUS RESTARTS AGE> polaris-dashboard-69f5bc4b5d-8jz24 1/1 Running 0 66s
Once the status reads
Running, we need to expose the Dashboard as a service so we can access it:kubectl expose deployment polaris-dashboard -n polaris --name polaris-dashboard-service --type="NodePort" --port=8080> service/polaris-dashboard-service exposed
The Polaris Dashboard is now running in your cluster, and exposed to the internet. You can open it by typing:
You can open the webpage by forwarding a local port to the service in your Cluster.
Execute this in a separate Terminal Window/Tab in order to be able to access the web page:
kubectl port-forward --namespace polaris $(kubectl get po -n polaris | grep polaris-dashboard | \awk '{print $1;}') 8080:8080And then navigating to http://localhost:8080/ in your browser.
Look around the Dashboard to get familiar with the checks.
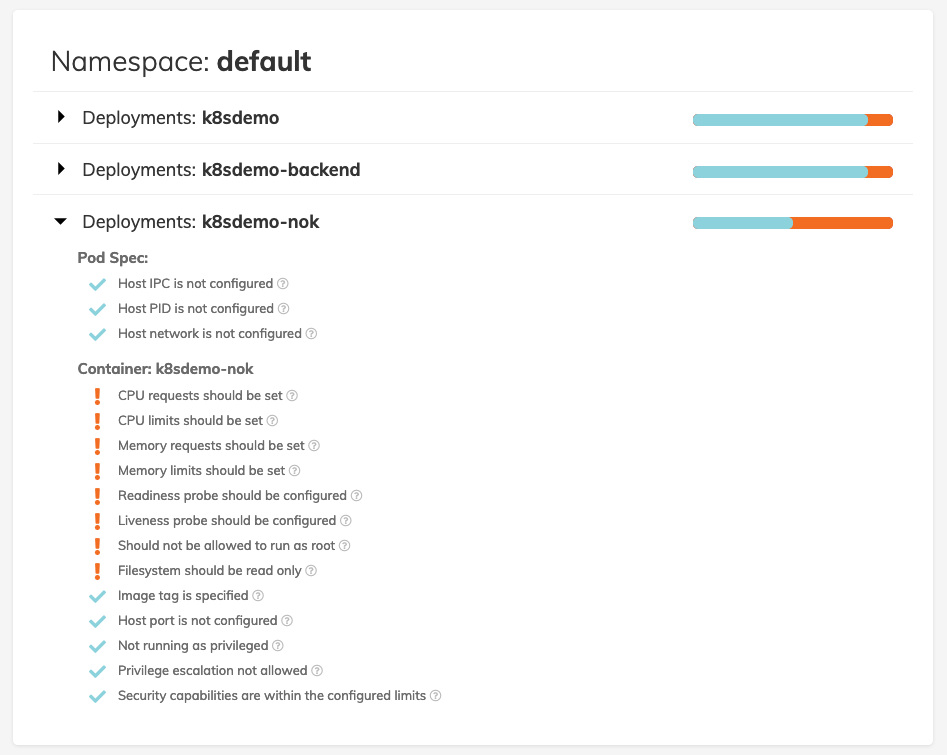
Let’s deploy a version of
k8sdemothat has some more problems by running:kubectl create -f ./deployment/demoapp-errors.yamlThis action will take a bit of time. To check the status of the running application, you can use
kubectl get pods.Check out the dashboard for the
k8sdemo-nokapplication and you will find that there are a lot more warnings for this deployment.
Clean-up by running:
kubectl delete -f ./deployment/demoapp-errors.yamlkubectl delete -f ./tools/polaris.yaml
Now on to the next tool…
Kube Hunter
Kube-hunter hunts for security weaknesses in Kubernetes clusters. The tool was developed to increase awareness and visibility for security issues in Kubernetes environments.
IMPORTANT!!! You should NOT run kube-hunter on a Kubernetes cluster you don’t own!
You can get more details here.
You have to install kubehunter as described here: https://github.com/aquasecurity/kube-hunter#deployment
Usually it’s:
pip install kube-hunter
Let’s examine the list of passive test (non intrusive, aka that do not change the cluster state) that kube-hunter runs:
kube-hunter --list> Passive Hunters:> ----------------> * Mount Hunter - /var/log> Hunt pods that have write access to host's /var/log. in such case, the pod can traverse read files on the host machine>> * Host Discovery when running as pod> Generates ip adresses to scan, based on cluster/scan type>> * API Server HunterLet’s examine the list of passive test (non intrusive, aka that do not change the cluster state) that kube-hunter runs:
kube-hunter --list --active> Passive Hunters:> ----------------...> Active Hunters:> ---------------> * Kubelet System Logs Hunter> Retrieves commands from host's system audit>
Before the scan we have to expose the ingress
minikube tunnel
Now let’s run an active and passive test against our minikube cluster::
kube-hunter --remote 127.0.0.1 --active> ~ Started> ~ Discovering Open Kubernetes Services...> |> | Etcd:> | type: open service> | service: Etcd> |_ location: localhost:2379> |> | Kubelet API (readonly):
Findings
You should get no findings, meaning that the Minikube instance has been correctly configured.
If you get vulnerabilities like the following, this might be due to the fact that minikube API by default allows for access with user system:anonymous.
+-----------------+----------------------+----------------------+----------------------+----------+| LOCATION | CATEGORY | VULNERABILITY | DESCRIPTION | EVIDENCE |+-----------------+----------------------+----------------------+----------------------+----------+| localhost:10250 | Remote Code | Anonymous | The kubelet is | || | Execution | Authentication | misconfigured, | || | | | potentially allowing | || | | | secure access to all | || | | | requests on the | || | | | kubelet, without the | |
This should (hopefully!) not be the case in your clusters and in this case could be remediated by launching minikube with the option --extra-config=apiserver.anonymous-auth=false
kubesec
kubesec is a utility that performs security risk analysis for Kubernetes resources and tells you what you should change in order to improve the security of those pods. It also gives you a score that you can use to create a minimum standard. The score incorporates a great number of Kubernetes best practices.
Yu have to install KubeSec as described here: https://github.com/controlplaneio/kubesec/releases
Launch a test against the demo application
kubesec scan ./deployment/demoapp.yamlThe output is in JSON format that can easily be integrated into a CI/CD process.
[{"object": "Deployment/k8sdemo.default","valid": true,"message": "Passed with a score of 4 points","score": 4,"scoring": {"advise": [{Launch a test against a really vulnerable app
kubesec scan ./kubesec/critical.yamlThe output is in JSON format that can easily be integrated into a CI/CD process.
[{"object": "Pod/kubesec-test.default","valid": true,"message": "Failed with a score of -37 points","score": -37,"scoring": {"critical": [{
kubesec gives us a simple tool to check the deployment manifests early on and integrate into a CI/CD process at build-time. KubeSec can run in different ways (commandline, Docker container and even as a Kubernetes admission hook) in order to facilitate that integration.
conftest
conftest is a utility to help you write tests against structured configuration data. For instance you could write tests for your Kubernetes configurations, or Tekton pipeline definitions, Terraform code, Serverless configs or any other structured data.
You have to install ConfTest as described here: https://www.conftest.dev/install/
Launch a test against the demo application
conftest test -p ./conftest/src/examples/kubernetes/policy ./deployment/demoapp.yaml> FAIL - /Users/nhirt/training/deployment/demoapp.yaml - main - Containers must not run as root in Deployment k8sdemo> FAIL - /Users/nhirt/training/deployment/demoapp.yaml - main - Deployment k8sdemo must provide app/release labels for pod selectors> FAIL - /Users/nhirt/training/deployment/demoapp.yaml - main - k8sdemo must include Kubernetes recommended labels: https://kubernetes.io/docs/concepts/overview/working-with-objects/common-labels/#labels> FAIL - /Users/nhirt/training/deployment/demoapp.yaml - main - Found deployment k8sdemo but deployments are not allowed ```Launch a test against all the files for the demo application
The output format here is set to TAP (Test Anything Protocol)
conftest test -p ./conftest/src/examples/kubernetes/policy --output=tap ./deployment/*.yaml> 1..3> not ok 1 - /home/training/training/deployment/demoapp-backend.yaml - Containers must not run as root in Deployment k8sdemo-backend> not ok 2 - /home/training/training/deployment/demoapp-backend.yaml - Deployment k8sdemo-backend must provide app/release labels for pod selectors> not ok 3 - /home/training/training/deployment/demoapp-backend.yaml - k8sdemo-backend must include Kubernetes recommended labels: https://kubernetes.io/docs/concepts/overview/working-with-objects/common-labels/#labels> 1..3> not ok 1 - /home/training/training/deployment/demoapp-errors.yaml - Containers must not run as root in Deployment k8sdemo-nok> not ok 2 - /home/training/training/deployment/demoapp-errors.yaml - Deployment k8sdemo-nok must provide app/release labels for pod selectors> not ok 3 - /home/training/training/deployment/demoapp-errors.yaml - k8sdemo-nok must include Kubernetes recommended labels: https://kubernetes.io/docs/concepts/overview/working-with-objects/common-labels/#labels> 1..1
Launch a test against sample Dockerfile
The output format here is set to JSON.
conftest test -p ./conftest/src/examples/docker/policy --output=json ./conftest/src/examples/docker/DockerfileA blakclisted base image has been detected:
[{"filename": "/Users/nhirt/training/conftest/src/examples/docker/Dockerfile","namespace": "main","successes": 0,"failures": [{"msg": "unallowed image found [\"openjdk:8-jdk-alpine\"]"}