Lab 3: Deploy BookInfo application
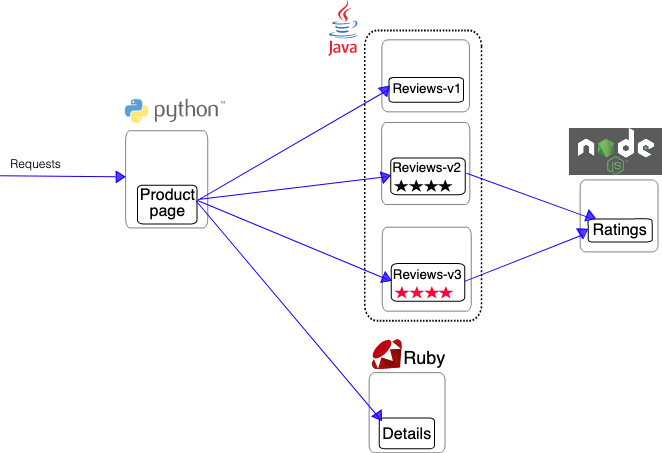
In this part, we will be using the sample BookInfo Application that comes as default with Istio code base. As mentioned above, the application that is composed of four microservices, written in different languages for each of its microservices namely Python, Java, Ruby, and Node.js. The default application doesn’t use a database and all the microservices store their data in the local file system.

Envoys are deployed as sidecars on each microservice. Injecting Envoy into your microservice means that the Envoy sidecar would manage the ingoing and outgoing calls for the service. To inject an Envoy sidecar to an existing microservice configuration, do:
kubectl apply -f ~/training/istio/samples/bookinfo/platform/kube/bookinfo.yaml

> service/details created
> serviceaccount/bookinfo-details created
> deployment.apps/details-v1 created
> service/ratings created
> ...
After a few minutes, you should now have your Kubernetes Pods running and have an Envoy sidecar in each of them alongside the microservice. The microservices are productpage, details, ratings, and reviews. Note that you’ll have three versions of the reviews microservice.
kubectl get pods


> NAME                                        READY     STATUS    RESTARTS   AGE
> details-v1-1520924117-48z17                 2/2       Running   0          6m
> productpage-v1-560495357-jk1lz              2/2       Running   0          6m
> ratings-v1-734492171-rnr5l                  2/2       Running   0          6m
> reviews-v1-874083890-f0qf0                  2/2       Running   0          6m
> reviews-v2-1343845940-b34q5                 2/2       Running   0          6m
> reviews-v3-1813607990-8ch52                 2/2       Running   0          6m
Expose the Application via Ingress Gateway
The components deployed on the service mesh by default are not exposed outside the cluster. External access to individual services so far has been provided by creating an external load balancer or node port on each service.
An Ingress Gateway resource can be created to allow external requests through the Istio Ingress Gateway to the backing services.
-
Create an Istio ingress gateway to access your services over a public IP address.
kubectl apply -f  ~/training/istio/samples/bookinfo/networking/bookinfo-gateway.yaml

> gateway.networking.istio.io/bookinfo-gateway created
> virtualservice.networking.istio.io/bookinfo created
``
-
Open the webpage
 Training VM
If you are using the training VM, you can open the webpage directly by typing:
firefox --new-tab http://$(minikube ip):30762/productpage
 Cloud/Standalone
If you are NOT using the training VM, you can open the webpage by forwarding a local port to the service in your Cluster.
Execute this in a separate Terminal Window/Tab in order to be able to access the web page:
kubectl port-forward --namespace istio-system $(kubectl get po -n istio-system | grep istio-ingressgateway| \awk '{print $1;}') 8080:8080Now you can access your application via http://localhost:8080/productpage
If you refresh the page multiple times, you’ll see that the reviews section of the page changes. That’s because there are 3 versions of reviews(reviews-v1, reviews-v2, reviews-v3) deployment for our reviews service. Istio’s load-balancer is using a round-robin algorithm to iterate through the 3 instances of this service
V1 - No ratings

V2 - Ratings with black stars

V3- Ratings with red stars

Sidecar injection
In Kubernetes, a sidecar is a utility container in the pod, and its purpose is to support the main container. For Istio to work, Envoy proxies must be deployed as sidecars to each pod of the deployment. There are two ways of injecting the Istio sidecar into a pod: manually using the istioctl CLI tool or automatically using the Istio Initializer. In this exercise, we will use the manual injection. Manual injection modifies the controller configuration, e.g. deployment. It does this by modifying the pod template spec such that all pods for that deployment are created with the injected sidecar.